Configurations will be connected with creator accounts. It is recommended to not use private accounts.
Google IDP configuration
- Go to the website https://console.developers.google.com, then log into google account.
- Accept Google Cloud Platform policy if needed.
- In main view choose "NEW PROJECT" option.
- Fill in "Project name" field. You can use any name, but it is recommended to use the name of the application combined with the name of institution, e.g. "dLibra - Our Digital Library". This name will be used to identify applications connected to accounts.
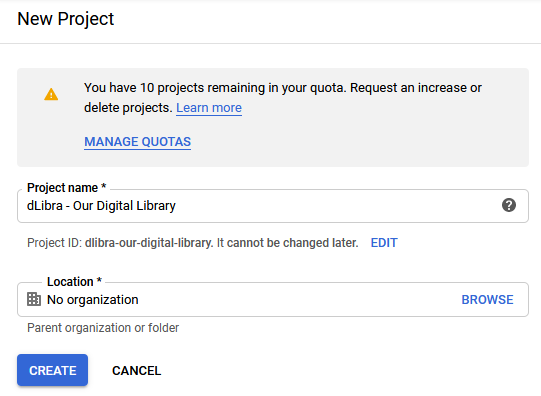
- Create project.
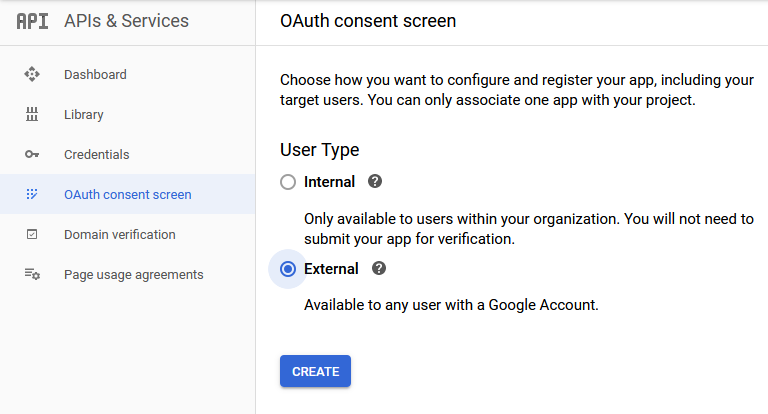
- Click "OAuth consent screen" option on the left panel, then choose "External" user type and create configuration.
- Fill in "Application name" field. It will be visible at Google Login form in dLibra web application. Just like before, it is recommended to use combination of application and institution names.
- Optionally upload "Application logo" that will be visible at Google Login form.
- Optionally fill in "Authorized domains" sections. First field like "our-digital-library.com". Then "Application Homepage link" like "https://our-digital-library.com/dlibra". And then "Application Privacy Policy link" like "https://our-digital-library/dlibra/text?id=policy". You can fill in "Application Terms of Service" as well, if you have one.
- Save configuration.
- Go to "Credentials". Click "CREATE CREDENTIALS" and then "OAuth cliend ID".

- Choose "Web application" as "Application Type".
- Fill in "Name" field. You can use any name, but it is recommended to use combination of application and institution names.
- In section "Authorized Javascript Origins" add records with domain name, without context path, e.g. "http://our-digital-library.com" and "https://our-digital-library.com".
- In section "Authorized redirect URIs" add records with domain name and context path, e.g. "https://our-digital-library.com/dlibra" and "http://our-digital-library.com/dlibra".
- Save configuration.
- Copy "Client ID" value.
Edit file "user-providers.xml" on "WEB-INF/conf" path web application directory. Uncomment GoogleUserInformationProvider node and replace CLIENT_ID with value copied before.
user-providers.xml<pl.psnc.dlibra.web.comp.user.oauth.google.GoogleUserInformationProvider><configuration><loginPage>${homepage}/dlibra/login</loginPage><logoutPage>${homepage}/dlibra/main?action=LogoutAction</logoutPage><methodNameResourceKey>LoginComponent.uip.google.name</methodNameResourceKey></configuration><additionalConfiguration><clientId>CLIENT_ID</clientId></additionalConfiguration></pl.psnc.dlibra.web.comp.user.oauth.google.GoogleUserInformationProvider>- Restart web application server. Then, it should be possible to log into web application with Google account.
Facebook IDP configuration
- Go to website https://developers.facebook.com/ and log into Facebook account.
- Click "My Apps" in right upper corner, then "Create APP".

- Fill in "Display Name" field. That name will be visible in Facebook Login form in web application. It is recommended to use combination of application and institution names, e.g. "dLibra - Our Digital Library".
- "Contact Email" field should contatain email of person responsible for facebook login configuration. By default it takes creator email.
- Create App ID.
- Set up Facebook Login.

- Then choose "WEB" option.
- Fill in "Site URL" field with your web service address, e.g. "https://our-digital-library.com" (without context path). Then confirm.
- Go to "Settings" -> "Basic".

- Fill in "App Domains" with domain name, eg. "our-digital-library.com".
- Fill in "Privacy Policy URL", eg."https://dingo.psnc.pl/en/privacy-policy/"), optionally "Terms of Service URL".
- Optionally upload "App Icon". It will be visible in Facebook Login form.
- Set application category. Based on facebook categories description, dLibra belongs to "Entertainment" category.
- Save changes.
- Copy "App ID" and "App Secret".
- Go to permissions panel "App Review" → "Permissions and Features" and set "Advanced Access" for email using "Request Advanced Access" button

- Click switch near "In development", then confirm with "Switch Mode". "In development" should change to "Live". In means that application was successfully activated.

Edit file "user-providers.xml" on "WEB-INF/conf" path web application directory. Uncomment FacebookUserInformationProvider node and replace CLIENT_ID and CLIENT_SECRET with previously copied values.
user-providers.xml<pl.psnc.dlibra.web.comp.user.oauth.facebook.FacebookUserInformationProvider><configuration><loginPage>${homepage}/dlibra/login</loginPage><logoutPage>${homepage}/dlibra/main?action=LogoutAction</logoutPage><methodNameResourceKey>LoginComponent.uip.facebook.name</methodNameResourceKey></configuration><additionalConfiguration><clientId>CLIENT_ID</clientId><clientSecret>CLIENT_SECRET</clientSecret></additionalConfiguration></pl.psnc.dlibra.web.comp.user.oauth.facebook.FacebookUserInformationProvider>- Restart web application server. Then, it should be possible to log into web application with Facebook account.