...
General information
| labelimg | ||||
|---|---|---|---|---|
| ||||
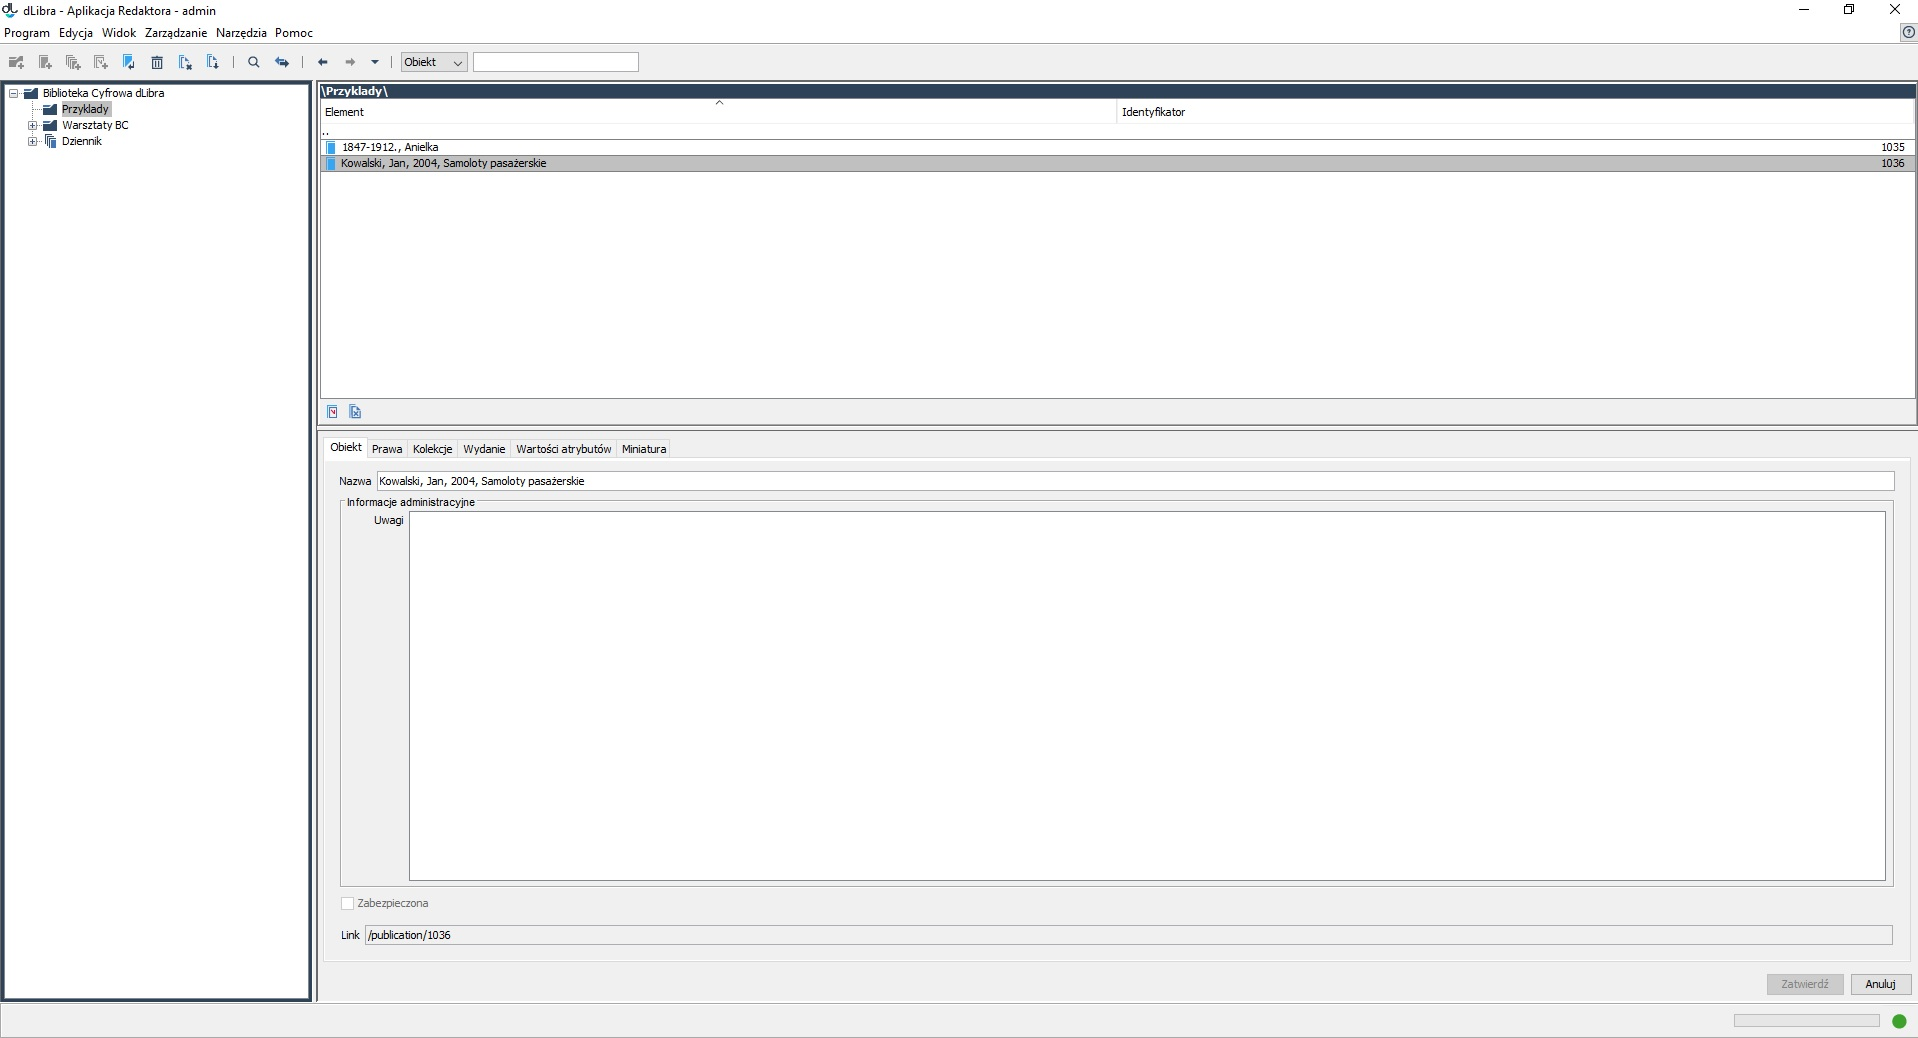
Główne okno aplikacji redaktora (rysunek powyżej) składa się z pięciu podstawowych części:
- Drzewa katalogów umiejscowionego po lewej stronie. Przedstawia ono hierarchiczną strukturę biblioteki - katalogi biblioteki.
- Lista elementów (prawa górna część okna) przedstawiająca listę elementów, które zawiera wybrany obiekt.
- Okno własności (prawa dolna część okna) zawierające zakładki na których znajdują się informacje na temat wybranego na liście elementów obiektu.
- Menu główne znajdujące się w górnej części okna aplikacji redaktora,
- Pasek narzędzi (poniżej menu głównego) umożliwiający szybki dostęp do najczęściej wykonywanych operacji (np. tworzenie nowego obiektu).
Standardowy rozkład elementów aplikacji redaktora przedstawiono na rysunku powyżej. Rozkład ten można w ograniczonym stopniu dostosować do potrzeb użytkownika. Do dyspozycji użytkownika są miejsca w których standardowo umieszczone są lista elementów i okno własności. W obu tych miejscach można umieścić zarówno okno własności jak i listę elementów. Możliwe jest zatem porównanie własności dwóch elementów (wyświetlenie dwóch okien własności) lub manipulowanie na dwóch listach elementów (umożliwia przenoszenie elementów biblioteki).
Aby zmienić wyświetlany element w miejscu gdzie standardowo wyświetlana jest lista elementów należy przycisnąć ALT+F1 - pojawi się okno własności. Aby powrócić do listy elementów należy ponownie wybrać ALT+F1. Aby zmienić wyświetlany element w miejscu gdzie domyślnie znajduje się okno własności należy wybrać ALT+F2 - pojawi się lista elementów, aby powrócić do okna własności należy ponownie wybrać ALT+F2.
Drzewo katalogów
Drzewo katalogów umieszczone jest w lewej części okna programu redaktora. Katalogi umożliwiają hierarchiczne porządkowanie dokumentów w systemie na potrzeby redaktorów i administratorów. Struktura katalogów widoczna jest tylko dla redaktorów i administratorów (dla użytkowników stron WWW nie jest ona widoczna). Na drzewie katalogów znajdować się mogą następujące węzły:
węzeł katalogu - przedstawia katalog biblioteki, może zawierać katalogi podrzędne oraz obiekty grupowe,
Z każdym węzłem związane jest menu kontekstowe, które umożliwia szybki dostęp do najczęściej wykonywanych operacji na danym typie elementu (np. dodawanie obiektów). Menu to wywoływane jest po kliknięciu na węźle prawym przyciskiem myszy.
Po dwukrotnym kliknięciu na wybrany węzeł drzewa katalogów lista elementów (prawa górna część okna) jest wypełniana elementami, które zawiera element reprezentowany przez wybrany węzeł.
Lista elementów
Informacje podstawowe
Lista elementów pozwala na przeglądanie zawartości biblioteki cyfrowej. Domyślnie na liscie znajdują się elementy pochodzące z głównego katalogu biblioteki. Elementy znajdujące się na liście można otwierać dwukrotnie klikając na wybrany element myszką lub przyciskając klawisz ENTER (gdy element który chcemy otworzyć jest wybrany na liście). Aby przejść o jeden poziom wyżej należy przycisnąć klawisz BACKSPACE lub dwukrotnie kliknąć element znajdujący się na pierwszej pozycji oznaczony jako ".." (element ten nie jest obecny na liście elementów które zawiera katalog główny ponieważ nie da się przejść poziom wyżej ponad katalog główny). Ścieżka do aktualnie otwartego elementu znajduje się w górnej części listy elementów.
Po zaznaczeniu elementu na liście okno własności (prawa dolna część okna) wypełnia się szczegółowymi informacjami na temat wybranego elementu.
Na liście elementów mogą znajdować się:
- węzeł folderu (ikonka folderu taka jak w systemie operacyjnym na którym uruchomiony jest program) - reprezentuje folder, który grupuje pliki obiektu lub wersje plików obiektu,
- węzeł pliku obiektu (ikonka zależna od typu pliku) - reprezentuje plik obiektu i zawiera wszystkie wersje tego pliku,
- węzeł wersji (ikonka zależna od typu pliku) - reprezentuje pojedynczą wersję pliku obiektu,
Z każdym elementem związane jest menu kontekstowe, które umożliwia szybki dostęp do najczęściej wykonywanych operacji na danym typie elementu (np. dodawanie nowych wersji plików). Menu to wywoływane jest po kliknięciu na elemencie prawym przyciskiem myszy.
W dolnej części listy elementów znajdują się dwa przyciski służące do ukrywania elementów znajdujących się na liście. Obecnie możliwe jest ukrywanie obiektów planowanych oraz obiektów z usuniętą treścią.
Okno Własności
|
The main window of the Editor Application
The main window of the Editor Application (shown in the image above) consists of five basic parts:
- a directory tree on the left, which presents the hierarchical structure of the library – the library directories;
- an element list (the upper right part of the window), which presents the list of the elements of the selected object;
- a property window (the lower right part of the window), which contains tabs with information about the object selected from the list;
- a main menu in the upper part of the window; and
- a toolbar (below the main menu), which allows fast access to the most frequently performed operations (for example, creating a new object).
The standard layout of the elements of the Editor Application is presented in the image above. That layout can be personalized to a great degree. The user can arrange elements in the places which are, by default, occupied by the element list and the property window. In both places, there can be either a property window or an element list, so the user can compare the properties of two elements (by displaying two property windows) or manipulate elements on two lists, which makes it possible to move library elements.
In order to change the element displayed in the element list position, ALT+F1 should be clicked. The property window will appear. In order to go back to the element list, one should click ALT+F1 again. In order to change the element displayed in the position of the property window, one should click ALT+F2. The element list will appear. In order to go back to the property window, one should click ALT+F2 again.
Directory Tree
The directory tree is in the left part of the Editor Application window. Directories make it possible to put documents in the system in a hierarchical order, for use by editors and administrators. The structure of directories is only visible for editors and administrators (it is not visible for website users). The directory tree may contain the following nodes:
 directory node – presents the library directory and may contain subdirectories and group objects; and
 group object node – represents a group object and may contain subordinate group objects.
There is a context menu for each node. Context menus allow fast access to the operations which are performed the most frequently on the given type of element (for example, adding objects). A context menu is called by right-clicking the node.
When the user clicks any directory tree node twice, the element list (the upper right part of the window) is filled in with the elements comprising the element represented by the selected node.
Element List
Basic Information
The element list makes it possible to review the content of the digital library. By default, it contains the elements from the root directory of the library. An element on the element list can be opened by double-clicking it or by selecting it and pressing the “Enter” button. In order to navigate one level higher, the user should press the “Backspace” button or double-click the “..” element in the first position (that element does not appear on the element list for the root directory because it is not possible to go to a higher level than the root directory). The path to the element open at any given moment is shown in the upper part of the element list.
After an element on the list has been selected, the property window (the lower right part of the window) is filled in with detailed information about that element.
The element list may contain:
- a directory node – represents the library directory and may contain subdirectories and objects;
- a group object node – represents a group object which may contain other objects, including group objects;
 a planned object node – represents a planned object and does not contain any subordinate nodes;
 an object node – represents an object; in the advanced mode, it contains the nodes of the editions of the object and the node of the files of the object, and in the simplified mode, that is, when the object only has one edition, it only contains the file versions of that edition;
 a node of an object the content of which has been removed – represents an object the content of which has been removed; it only contains the edition nodes;
 an edition node – represents an object edition and contains those versions of the files of the object which comprise the edition;
 an object files’ node – contains all files of an object;
- a folder node (the folder icon is the same as the folder icon in the operating system in which the program is being run) – represents the folder which groups object files or object file versions);
- an object file node (the icon depends on the file type) – represents an object file and contains all versions of that file; and
- a version node (the icon depends on the file type) – represents a single version of an object file.
There is a context menu for each element. Context menus allow fast access to the operations which are performed the most frequently on the given type of element (for example, adding new file versions). A context menu is called by right-clicking the element.
In the lower part of the element list, there are two buttons for hiding elements on the list. Currently, the user can hide planned objects and objects the content of which has been removed.
The Property Window
The property window consists of a few tabs (the number of tabs depends on the type of the selected element). Every tab contains a property editor which makes it possible to modify particular properties of elements selected on the element list. Clicking the “Confirm” button will result in saving the information in the tabs. Clicking the “Cancel” button or selecting another element on the element list will result in undoing all changes introduced since the last “Confirm” operationOkno własności składa sie z kilku zakładek (liczba zależy od typu zaznaczonego elementu). Każda zakładka zawiera edytor właściwości, który pozwala na modyfikację określonych właściwości wybranego na liście elementów elementu. Wciśnięcie przycisku Zatwierdź powoduje zapisanie w systemie informacji znajdujących się na zakładkach. Kliknięcie przycisku Anuluj lub wybranie innego elementu na liście elementów wycofuje wszystkie zmiany wprowadzone od ostatniej operacji Zatwierdź.