...
| Info |
|---|
If you are installing our docker for the first time please go to the next section of this documentation. |
...
imas/ual
catalog_qt_2
dashboard-ReactJS
imas-watchdog
Make sure you can access the imas/ual
This Catalogue Qt 2 Docker image is based on the imas/ual Docker image. It is available from Docker registry rhus-71.man.poznan.pl.
Before you proceed, make sure you can access the registry. You can test it by executing the following command.
| Code Block |
|---|
> docker login rhus-71.man.poznan.pl |
You will be asked for a user name and password. If you don't have it, contact the developer of this project.
Make sure you can access catalog_qt_2
You will also need an access to the `catalog_qt_2` project. Make sure you can access it.
| Code Block |
|---|
> git clone --single-branch develop https://YOUR_USER_NAME@gforge6.eufus.eu/git/catalog_qt_2 |
You will be asked for a user name and password. If you don't have it, contact the developer of this project.
Make sure you can access dashboard-ReactJS
Docker image that contains Dashboard application can be downloaded from a Docker registry registry registry.apps.man.poznan.pl. Before you proceed, make sure you can access the registry. You can test it by executing the following command:
| Code Block |
|---|
> docker login registry.apps.man.poznan.pl/f4f/dashboard-ui/assets:branch-develop |
| Note |
|---|
Note! Running Dashboard locally requires an entry inside inside |
| Code Block |
|---|
127.0.0.1 localhost.dashboard-ui.pl |
Make sure you can access the imas-watchdog project
This repository is publicly available. All you have to do , is to double-check whether you can clone it in in docker-compose/build folder folder.
| Code Block |
|---|
> git clone --single-branch master https://github.com/tzok/imas-watchdog.git |
Building container
In order to build and run the container you have to do the following:
| Code Block |
|---|
> cd docker-compose/build > ./build.sh |
| Note |
|---|
If you would like to pull the latest codes while rebuiling rebuilding the container please use use |
Starting container
Catalogue QT 2 Docker can be run using multiple configurations. By default, we provide the following configurations
| Info |
|---|
|
You can run given configuration by calling:
| Code Block |
|---|
> cd docker-compose # ./run.sh -s <configuration file suffix> e.g. > ./run.sh -s notoken |
...
To access our application please paste this urls these URLs in your browser:
- http://localhost:8080/swagger-ui.html to access Web Services via Swagger-based UI.
- http://localhost.dashboard-ui.pl:9100/dashboard/ to access Dashboard-ReactJS
...
- The path where MySQL will store the data (default:
$(pwd)/db-data) - The path where pulsefiles are stored on the host (default:
$(pwd)/imasdb) - To map MySQL port to host port, so you can access the database from the container (by deafult default no ports are exposed)
- To add custom configuration of Web Services:
application.propertiesfile
Additionally, you can edit existing configurationconfigurations, or create your own e.g docker-compose.myconf.yml and run it!
...
These Web Services are run inside the Tomcat server.
Anatomy of application.properties file
...
The default configuration is inside our project, but (before building) if you want to use a diffrent different configuration (e.g enabling SSL certificates, enabling Keycloak) you can paste it in folder /catalogue_qt_docker/docker-compose/build/files/server another application.properties file, which will have higher priority and would override existing file in source codes and then . After this, you can build and run our docker.
If you have already build built a container , and want to change Web Services configuration, you can do that without rebuilding the docker!
All you need to do is to add application.properties file to this folder docker-compose/volumes/server-properties.
When the container is taken off, it will have the highest priority.
...
| Code Block |
|---|
> docker-compose rm > docker-compose up |
Setting up an SSL certificate
The best way to obtain an SSL certificate is to use certbot. You can get certbot in multiple ways described here.
After installation, you need to obtain the raw .pem certificate and convert it to .p12. Do this by running
...
You will be asked to provide a password. Remember it as you will have to enter it in in the application.properties. The output file keystore.p12 is the file that has all the required information to set up SSL.
...
Adding persistent storage
You can add persistent storage by setting it up inside inside docker-compose.yml file file
| Code Block |
|---|
services:
  db:
    volumes:
- ./volumes/mysql:/var/lib/mysql |
It is not required to link link ./volumes/mysql location location. In case you are using some other location for persistent data, feel free to use it instead.
Importing data from pulse file
Catalog QT Demonstrator allows to import importing MDSPlus based data automatically into SQL database. In order to do this, you have to bind mount a volume. In a plain text it means that layman terms, you have to tell Docker that you want to make your local filesystem to be available inside the Docker container. Easiest The easiest way to do it is to create a directory (or symbolic link) to a an MDSPlus compatible local database.
First of all, make sure you have MDSPlus like directory structure with pulse files. The easiest way to execute Docker container with sample data is to get sample data from box.psnc.pl - these are completely artificially created data prepared by the testing framework.
| Code Block |
|---|
> curl -s -o f4f_data.tar.gz \
https://box.psnc.pl/seafhttp/files/01953e73-8ad3-4277-be71-57b69c395355/f4f_data.tar.gz |
Make sure your directories structure looks like this:
| Code Block |
|---|
.
`-- catalogue_qt_docker
    `-- docker-compose
        `-- volumes
            `-- imasdb
                |-- f4f
                |   `-- 3
                |       |-- 0
                |       |   |-- ids_11062020.characteristics
                |       |   |-- ids_11062020.datafile
                |       |   |-- ids_11062020.populate
                |       |   |-- ids_11062020.tree
                |       |   |-- ids_11062021.characteristics
                |       |   |-- ids_11062021.datafile
                |       |   |-- ids_11062021.populate
                |       |   `-- ids_11062021.tree
                |       |-- 1
                |       |-- 2
                |       |-- 3
                |       |-- 4
                |       |-- 5
                |       |-- 6
                |       |-- 7
                |       |-- 8
                |       `-- 9
`-- script.sh |
Directory Directory catalogue_qt_docker/docker-compose/volumes/imasdb is is automatically mounted inside the Docker container. It means that anything you have will put in it, will be visible inside the Docker container whenever it is running. Once Docker is running you can schedule data population by creating a file with *.populate extension. You can do it the following way. Inside directory with the data, execute script.sh with the name of the database you want to have populated.
| Code Block |
|---|
> cd catalogue_qt_docker/docker-compose/volumes/imasdb > ./script.sh f4f |
If anything goes wrong, please delete all the the .populate files files by executing this command on linuxLinux:
| Code Block |
|---|
> find . -type f -name "*.populate" -delete |
...
Debugging in docker-compose
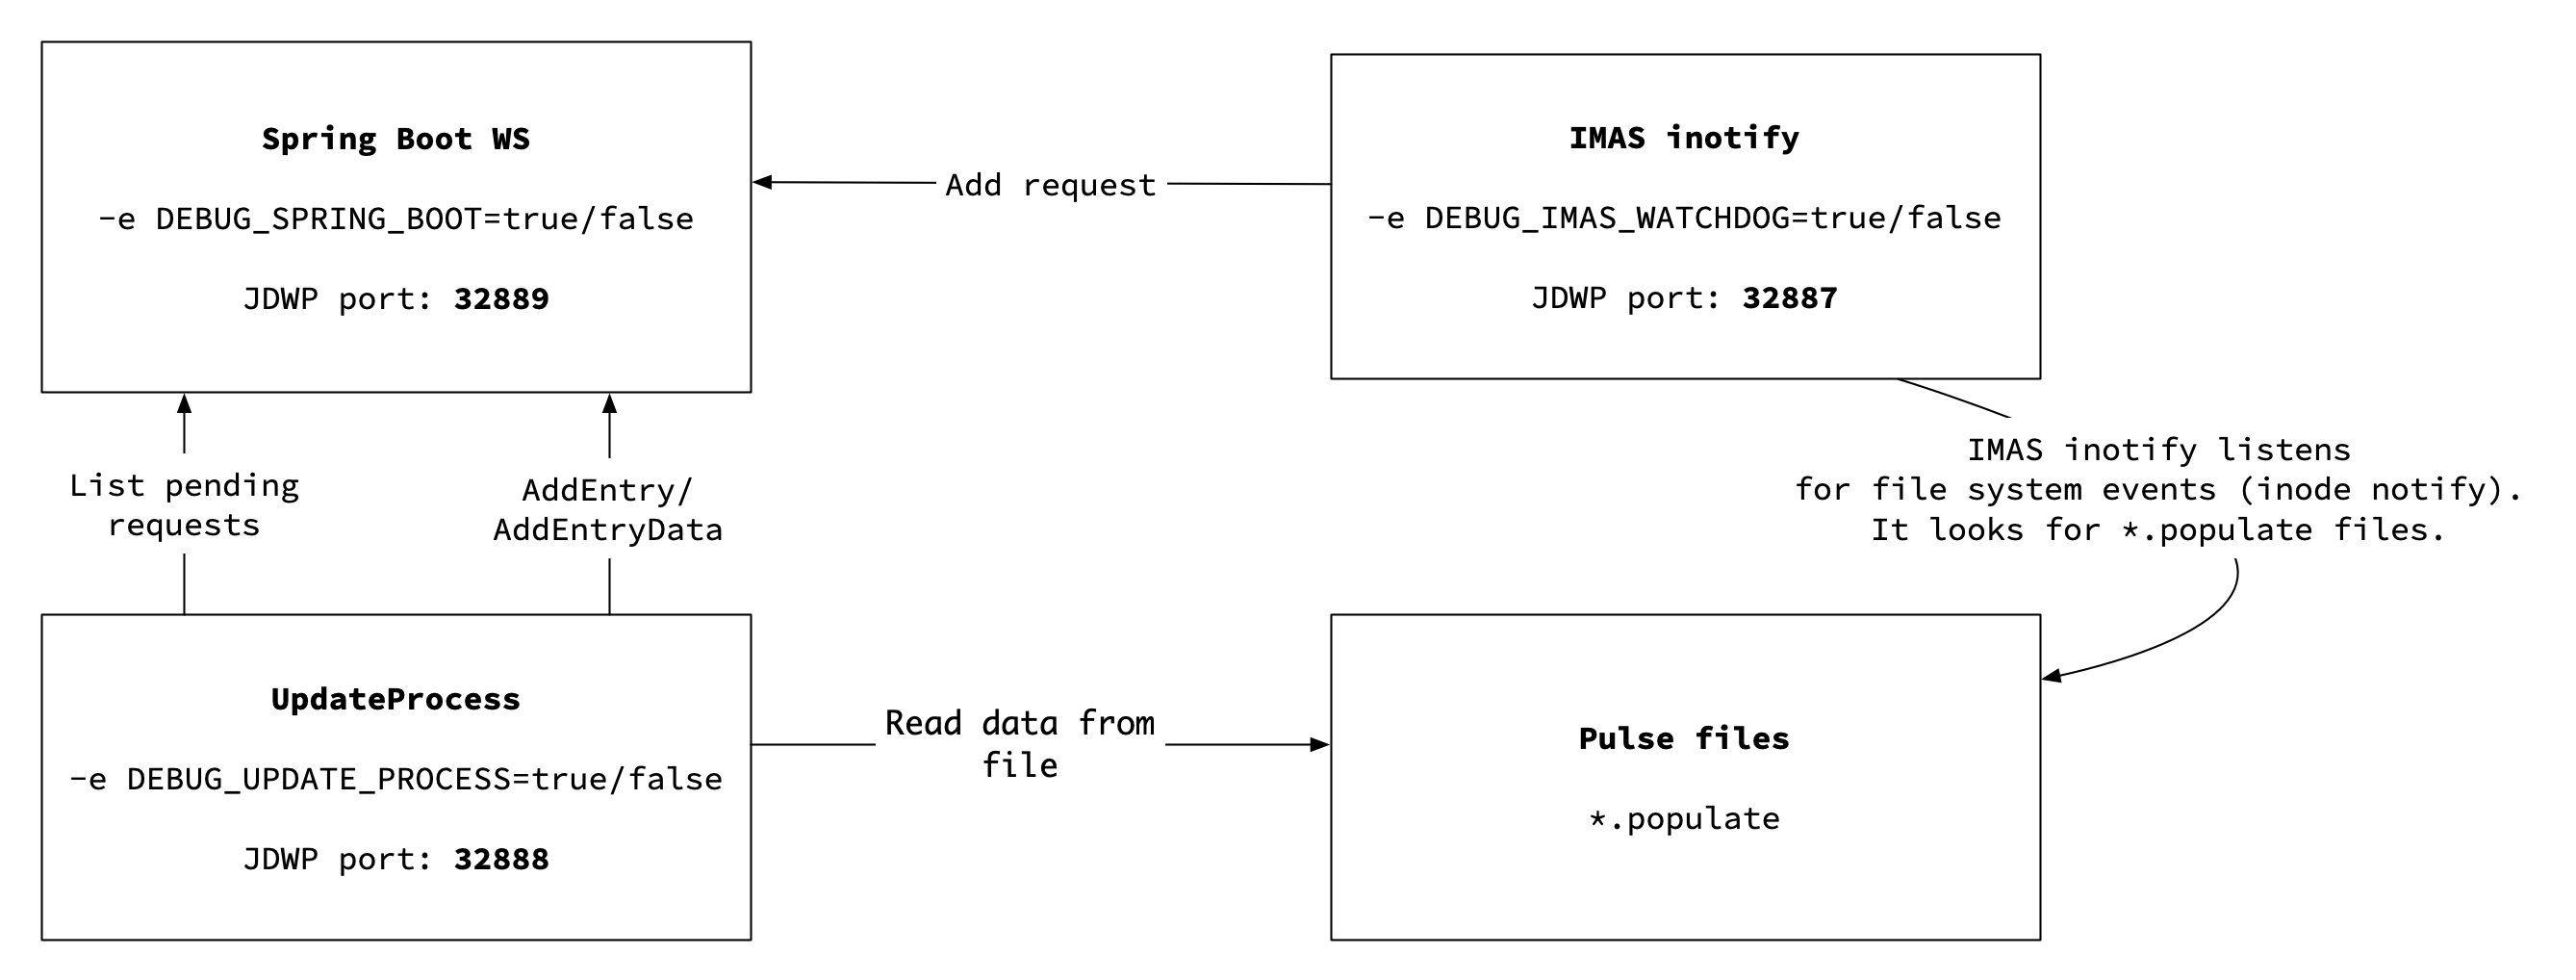
You can debug either all the Java-based components, inside the Docker container, or you can specify which one should be started in debug moremode. For debugging Java code inside Docker containers we are using JDWP protocolusing JDWP protocol, and by default we are using the following ports
| Info |
|---|
|
In order to enable debbug debug mode, you can either use predefined docker-compose.debug.yml or enable debug mode for each service separatelly separately by adding sections inside your YAML file of choice.
Catalog-ws-server
To debug catalog-ws-server you need to add the following lines to to docker-compose.####.yml in server section in server section
| Code Block |
|---|
  server:
    volumes:
      - ./volumes/imasdb:/home/imas/public/imasdb
    ports:
      - 32889:32889
    environment:
- DEBUG_SPRING_BOOT=true |
Update process
To debug update-process you need to add the following lines to to docker-compose.####.yml in updateprocess section in updateprocess section
| Code Block |
|---|
 updateprocess:
    volumes:
      - ./volumes/imasdb:/home/imas/public/imasdb
    ports:
      - 32888:32888
    environment:
- DEBUG_UPDATE_PROCESS=true |
Watchdog
To debug imas-watchdog you need to add the following lines to to docker-compose.####.yml in updateprocess section in updateprocess section
| Code Block |
|---|
  watchdog:
    volumes:
      - ./volumes/imasdb:/home/imas/public/imasdb
      - ./volumes/fair4fusion-docker-demo:/docker-entrypoint-properties.d
    ports:
      - 32887:32887
    environment:
- DEBUG_IMAS_WATCHDOG=true |
...
You can run unit tests by changing the directory to: ws/catalog-ws and running.
...
| Info |
|---|
Test code doesn't use MySQL server-based database. It's safe to run tests even after the database is already created. Tests will not touch your production database. |
...