...
In the last step of the new object creator and the mass publication upload creator, the editor can choose the “Send later” option. With that option selected, all information related to the object will be saved on the computer drive, and the creator will be closed. The object is not entered into the system (the object creation is postponed), so the editor does not have to wait for the object to be created (which takes especially long when the files are big). Such an object is placed on a special list of objects prepared for sending. That list is managed in the object sending window (see the image below), which is opened by selecting the “Send objects” position from the “Tools” menu.
| Anchor | ||||
|---|---|---|---|---|
|
Okno przesyłania obiektów
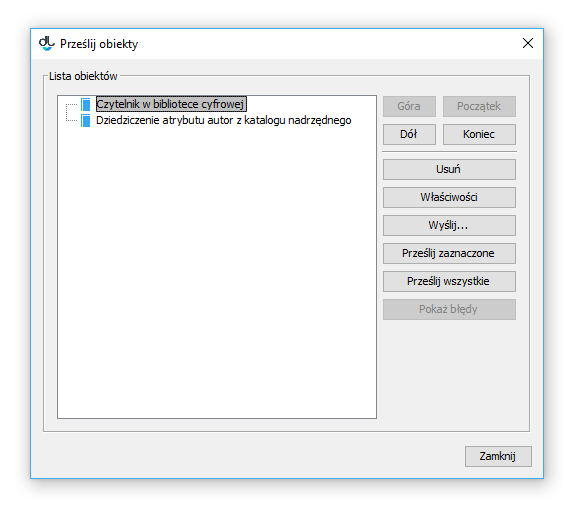
W oknie przesyłania obiektów po lewej stronie znajduje się drzewo obiektów przygotowanych do wysłania. Po stronie prawej znajduje się zestaw przycisków służących do zarządzania listą. Zestaw przycisków Góra, Dół, Początek, Koniec umożliwia zmianę pozycji wybranej na liście obiektów. Przycisk Usuń usuwa wybrany obiekt (wszystkie informacje z nim związane są nieodwracalnie utracone). Zmiana kolejności i usuwanie obiektów możliwe jest tylko na najwyższym poziomie drzewa (nie można zmieniać listy obiektów podrzędnych nowo tworzonego obiektu grupowego).
Object sending window
In the object sending window, on the left, there is a tree of objects prepared for sending. On the right, there is a set of buttons for managing the list. The “Up”, “Down”, “Home”, and “End” buttons are for changing the position of items selected on it. The “Remove” button is for removing the selected item (all information related to it will be irretrievably lost). Objects can only be rearranged and removed at the highest level of the tree (the list of subordinate object of a newly created group object cannot be changed).
The “Properties” button is for modifying the properties of the selected object. When the “Send selected” button is clicked, the process of creating all objects selected on the list is started up, and a dialog box with object creation progress is displayed. That box can be minimized (in such a case, the progress is visible on the application status bar in the bottom right-hand corner) so that the editor may continue working in the application while the object is being created in the background. In order to display the progress box again, the editor has to select the “Send objects...” option from the “Tools” menu. When the “Send all” button is clicked, the process of creating all object from the list is started up, and a dialog box with the progress of the object creation process is shown. That window can be minimized so that the editor can continue working in the application while the objects from the list are being created in the background. In order to display the progress box again, the editor has to select the “Send objects...” option from the “Tools” menu. When using the “Send...” button, the editor can specify a date and time in the future for sending the objects. When that button is clicked, there appears a window for entering additional parameters for the sent objects (see the image below)Przycisk Właściwości umożliwia modyfikację właściwości wybranego na liście obiektu. Przycisk Prześlij zaznaczone uruchamia proces tworzenia wszystkich zaznaczonych na liście obiektów i wyświetla okno dialogowe na którym widoczny jest postęp tworzenia obiektu. Okno to można zminimalizować (postęp tworzenia jest wtedy widoczny na pasku statusu aplikacji - prawy dolny róg) co pozwala kontynuować prace w aplikacji redaktora z równolegle trwającym w tle procesem tworzenia obiektu. Aby ponownie wyświetlić okno postępu należy wybrać opcję Prześlij obiekty... z menu Narzędzia. Przycisk Prześlij wszystkie uruchamia proces tworzenia wszystkich obiektów na liście. Wyświetlone zostaje okno dialogowe z postępem procesu tworzenia obiektów. Okno to można zminimalizować co pozwala redaktorowi powrócić do pracy z aplikacją redaktora podczas gdy równolegle w tle tworzone są obiekty z listy. Aby ponownie wyświetlić okno postępu należy wybrać opcję Prześlij obiekty... z menu Narzędzia. Przycisk Wyślij... pozwala redaktorowi na wyspecyfikowanie daty i godziny w przyszłości o której powinno rozpocząć się przesyłanie obiektów. Po wybraniu tego przycisku wyświetlane jest okno (rysunek poniżej) w którym możemy podać dodatkowe parametry wysyłania obiektów.
| Anchor | ||||
|---|---|---|---|---|
|
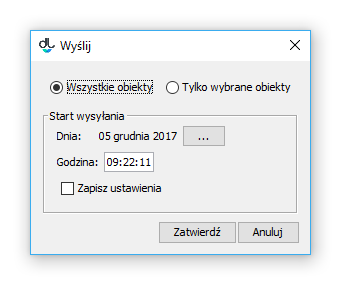
Okno z parametrami wysyłania obiektów
Parametry te określają po pierwsze to czy utworzone mają być wszystkie obiekty z listy, czy tylko te wybrane w drzewie po lewej stronie (odpowiednio opcje wyboru Wszystkie obiekty oraz Tylko wybrane obiekty). Po drugie są to informacje związane z datą i godziną rozpoczęcia procesu tworzenia obiektów. Po trzecie jest to pole wyboru Zapisz ustawienia, które zapisuje preferencje użytkownika tak, by przy następnym uruchomieniu tej funkcji wprowadzona godzina uruchomienia była taka sama, a dzień uruchomienia był oddalony w przyszłość o tyle samo dni od aktualnej daty. Parametry te pozwalają np. na rozłożenie obciążenia serwera w czasie (np. każdy redaktor ma przydzieloną godzinę na którą ustawia przesyłanie przygotowanych w ciągu dnia przez siebie obiektów). Po zatwierdzeniu parametrów wyświetlane jest okno na którym widoczny jest czas pozostały do uruchomienia procesu tworzenia obiektów. Po upływie tego czasu proces tworzenia obiektów jest uruchamiany. Okno to można zminimalizować przez co proces oczekujący na rozpoczęcie tworzenia obiektów i sam proces tworzący obiekty działa w tle. Aby ponownie wyświetlić okno postępu należy wybrać opcję Prześlij obiekty... z menu Narzędzia.
...
The window with the parameters for sending objects
The parameters include: first, the number of objects to be created (the “All objects” option for all objects from the list versus the “Only selected objects” option for only the objects selected in the tree on the left); second, the date and time of the beginning of the process of object creation, and, third, the “Save settings” checkbox for saving user preferences for the future (so that the same time and number of days before sending are used when the function is started up again). Those parameters make it possible to, among other things, distribute the load of the server over time (for example, every editor can be ascribed a different hour for sending the objects he or she has prepared during the day). Once the parameters have been confirmed, there appears a box with the time left until the startup of the object creation process. When that time has passed, the process is started up. The window can be minimized so that both the waiting process and the creation process run int he background. In order to display the progress box again, the editor has to select the “Send objects...” option from the “Tools” menu.
The last button, “Show errors”, is only useful in the case when errors have occurred during the object creation process. The objects the sending of which was unsuccessful are marked with an error icon on the object list. When the editor selects such an object and clicks the “Show errors” button, the sending errors are displayed. The editor may try to correct them by modifying the properties of the object (the “Properties” button).