...
- From the element list, select the directory or group object in which the new object is to be placed.
- From the context menu, select the “New object” function. You can also use the
 button on the toolbar or select an appropriate option from the main menu (“New object...” from the Management menu). After the “New object” function has been selected, the new object creator will be initiated.
 The first step of the new object creator is to select the main file of the object (see the image below). The user should select the “multi-format” option as the data source and indicate the directory on the local drive of the computer (by clicking the “Select a directory” button) which contains the subdirectories with objects in various formats (for the list of the object formats available by default, see the File Formats Available for Multi-Format Objects point. The directories for those formats should be named as follows:
- for the DjVu format – a directory labeled “DjVu”,
- for the PDF format – a directory labeled “PDF”,
- for the image gallery format – a the directory labeled “Gallery”,
- for the audio format – a directory labeled “Audio”,
- for the video format – a directory labeled “Video”,
- for the EPUB format – a directory labeled “EPUB”, and
- for the MOBI format – a directory labeled “MOBI”.
Next, the default format of the object should be indicated (in the “Default format” column). That format will be displayed when the website user does not indicate directly the format he or she wants to use (for example, after the object content icon has been clicked).
By default, the Editor Application detects the main file for every format automatically, but the main file for each format can be modified manually in the “Main file” column. The application identifies the main files for the formats in accordance with the following general rules:
- DjVu: Plikiem głównym jest plik o nazwie index*.djvu lub plik o nazwie index*.htm lub plik o nazwie index*.html, gdzie * oznacza dowolny ciąg znaków alfanumerycznych, znaku minus „-“ lub podkreślenie „_“.
- PDF: Plikiem głównym jest plik znajdujący się w katalogu. Plik powinien mieć rozszerzenie .pdf.
- Galeria zdjęć: Plikiem głównym jest plik wygenerowany automatycznie przez Aplikację Redaktora (presentation.xml) w przypadku galerii wielu obrazów lub plik graficzny jeśli w katalogu jest pojedynczy plik.
- Audio: Plikiem głównym jest plik znajdujący się w katalogu. Plik powinien być z rozszerzeniem .mp3, przygotowany w taki sposób by wspierał tzw. pobieranie progresywne.
- Wideo: Plikiem głównym jest plik znajdujący się w katalogu. Plik powinien być z rozszerzeneim .mp4, przygotowany w taki sposób by wspierał tzw. pobieranie progresywne.
- EPUB: Plikiem głównym jest plik znajdujący się w katalogu. Plik powinien być z rozszerzeniem .epub.
- MOBI: Plikiem głównym jest plik znajdujący się w katalogu. Plik powinien być z rozszerzeniem .mobi.

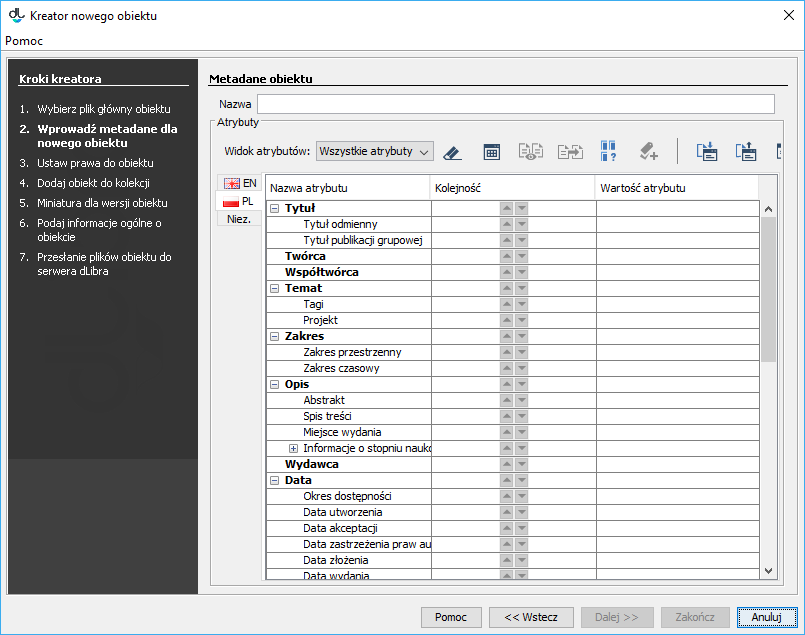
Anchor KreatorNowegoObiektu KreatorNowegoObiektu - In the second step (see the image below), the user should describe the new object with the use of a set of attribute values. For details about it, see the Bibliographic Description Editor chapter. In order to be able to go to the next step, the user must enter the name of the new object (in the “Name” field). By default, the name is created on the basis of the bibliographic description, by combining the name of the author and the date of edition (for information about changing the method of creating a default name, see the Configuring the Editor Application section. For example, if the title is “Fables”, the author is “John Smith”, and the date of edition is “2004”, then the name will be “John Smith, 2004, Fables” – with the author first, followed by the date of edition and the title. Whenever a user changes the bibliographic description, the name is updated. Off course, a user can also enter a different name or modify the default name. In such a case, the automatic update will be blocked. In order to proceed to the next step of the creator, the user should click the “Next” button.
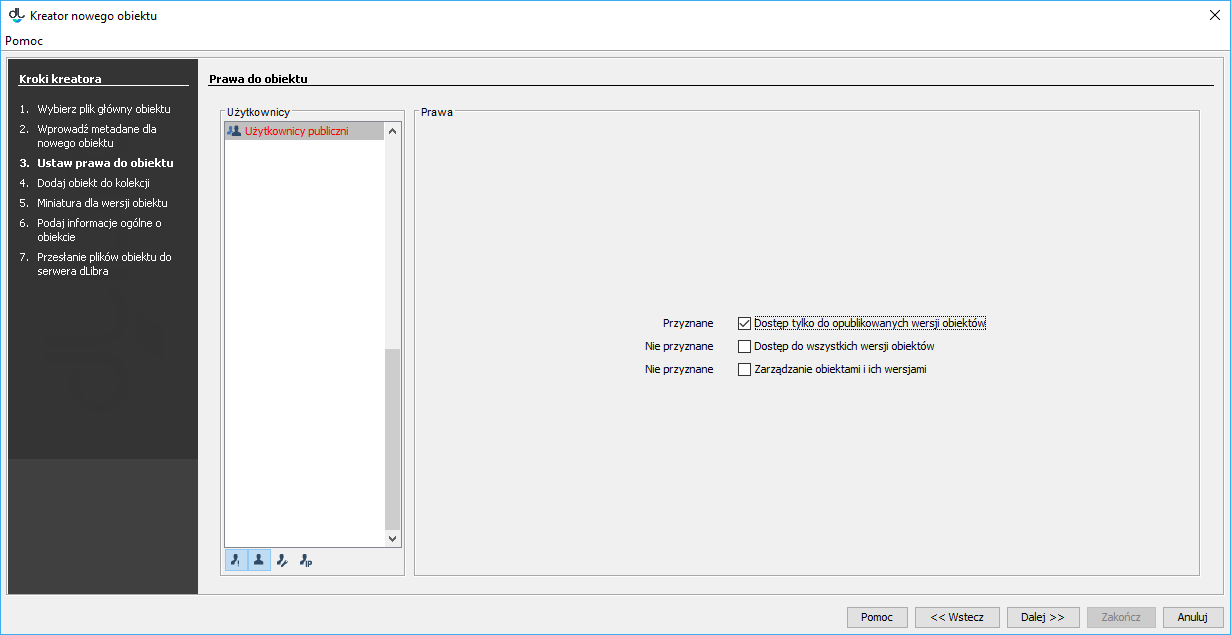
Trzecim krokiem (rysunek poniżej) jest nadanie użytkownikom praw do obiektu. Nadawanie praw opisane jest w części dotyczącej edytora praw. Aby przejść do kolejnego kroku kreatora należy nacisnąć przycisk DalejAnchor DodawanieMetadanych DodawanieMetadanych - The third step (see the image below) is to assign access permissions for the object to users. Permission assignment is described in the part about the permission editor. In order to proceed to the next step of the creator, the user should click the “Next” button.
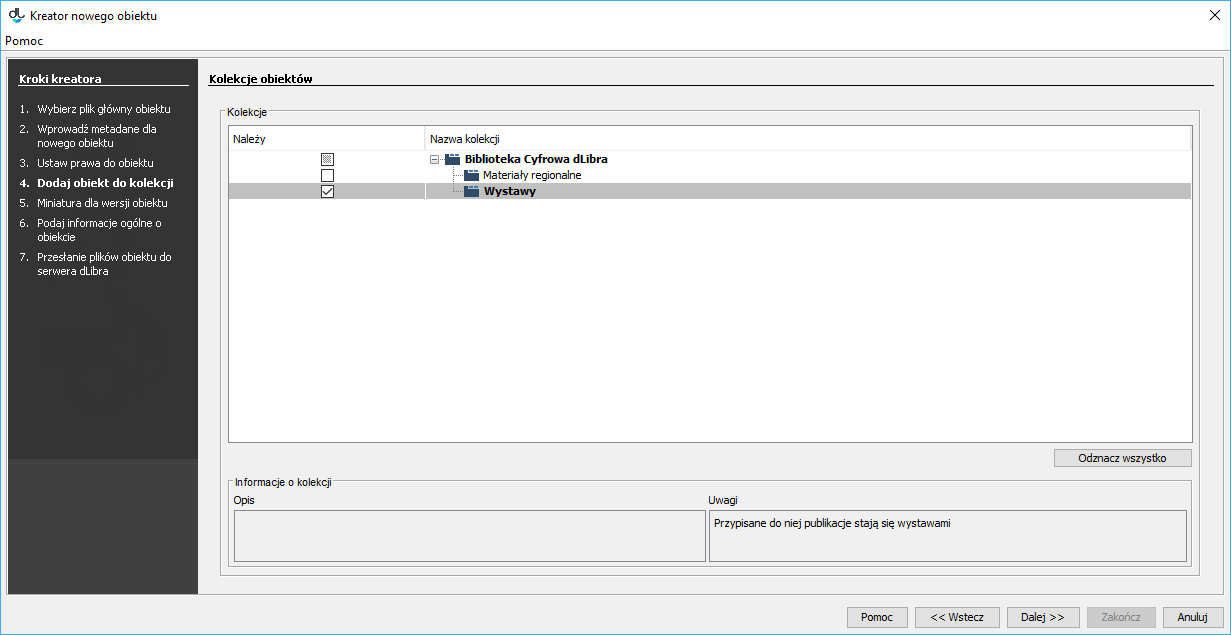
Anchor UstawianiePrawDoObiektu UstawianiePrawDoObiektu Czwartym krokiem kreatora (rysunek poniżej) jest przypisanie obiektu do kolekcji. Mechanizm ten jest dokładnie opisany w części dotyczącej edytora przynależności do kolekcji. Aby przejść do kolejnego kroku kreatora należy nacisnąć przycisk Dalej - In the fourth step (see the image below), the user should assign the object to a collection. The way to do that is described in detail in the section about the Editor for Assigning Objects to Collections. In order to proceed to the next step of the creator, the user should click the “Next” button.
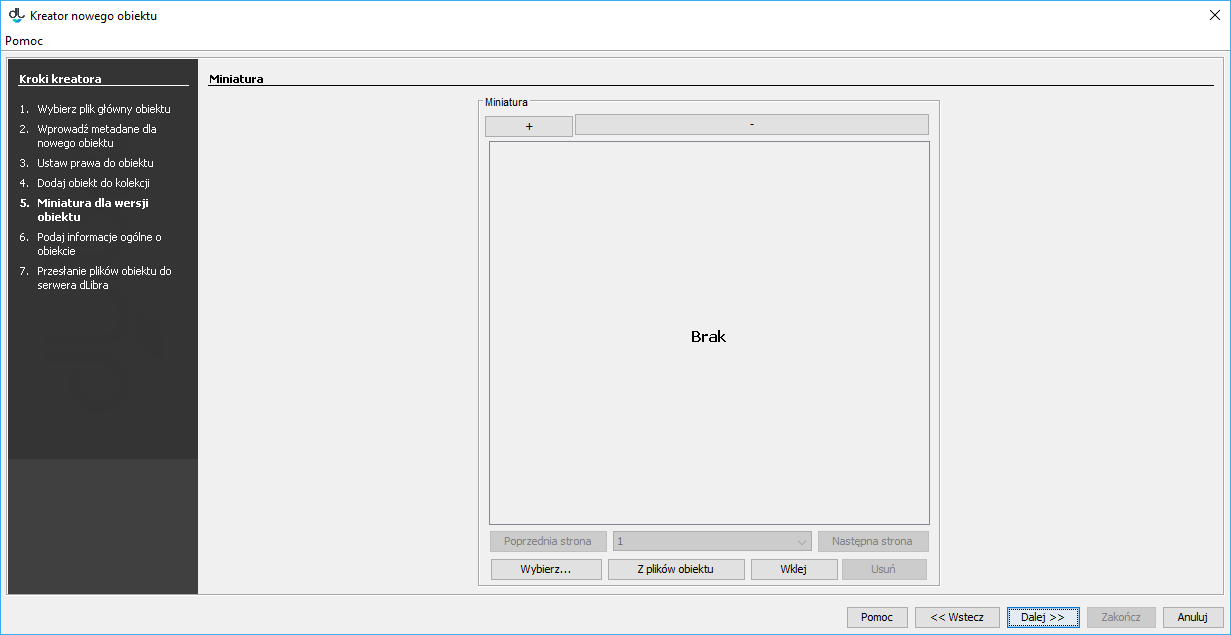
Anchor DodawanieObiektuDoKolekcji DodawanieObiektuDoKolekcji W piątym kroku kreatora nowego obiektu (rysunek poniżej) mamy możliwość wskazania miniatury obiektu. Miniatura to graficzna reprezentacja wydania widoczna dla użytkowników stron WWW przy informacjach na temat wydania. Aby wczytać miniaturę z pliku graficznego na dysku, kliknij przycisk Wybierz i wskaż plik. Jeśli w aplikacji zainstalowane jest rozszerzenie typu miniatureProvider obsługujące pliki wybrane w pierwszym kroku kreatora, aplikacja może automatycznie wygenerować propozycje miniatur. W tym celu należy kliknąć przycisk Z plików obiektu. Jeśli możliwe jest wygenerowanie wielu miniatur, właściwą miniaturę można wybrać poprzez wskazanie jej numeru na liście rozwijalnej (numery miniatur zazwyczaj odpowiadają numerom stron w obiekcie), lub przejrzeć kolejne miniatury, klikając na Poprzednia strona lub Następna strona. Można również wkleić obrazek ze schowka systemowego (przycisk Wklej). Jeśli aplikacja jest odpowiednio skonfigurowana, wybrane miniatury są automatycznie zmniejszane do wymaganych rozmiarów (szczegóły konfiguracji znajdują się tutaj). Miniatury wygenerowane z plików obiektu można dodatkowo powiększać lub zmniejszać, klikając na przyciski oznaczone znakami + i -. Aby przejść do kolego kroku kreatora należy nacisnąć przycisk Dalej - In the fifth step (see the image below), the user can indicate the thumbnail for the object. A thumbnail is a graphical representation of an edition; it is shown to web page users next to the information about the edition. In order to upload a thumbnail from a graphics file on the drive, the user should click the “Select” button and indicate the file. If there is an extension of the miniatureProvider type installed in the application and if it supports the file types selected in the first step of the creator, the application will be able to automatically generate thumbnail suggestions. For that purpose, the user should click the “From object files” button. If the application has generated many thumbnails, the user can select the correct one by indicating its number on the expandable list (thumbnail numbers usually correspond to the numbers of the pages of the object) or review the subsequent thumbnails by clicking the “Previous page” and “Next page” options. The user can also paste an image from the clipboard (with the use of the “Paste” button). If the application is configured properly, it will automatically reduce the thumbnail size to the required size (for the configuration details, see here). The user can also make the thumbnails bigger or smaller by clicking the buttons labeled + and -. In order to proceed to the next step of the creator, the user should click the “Next” button.
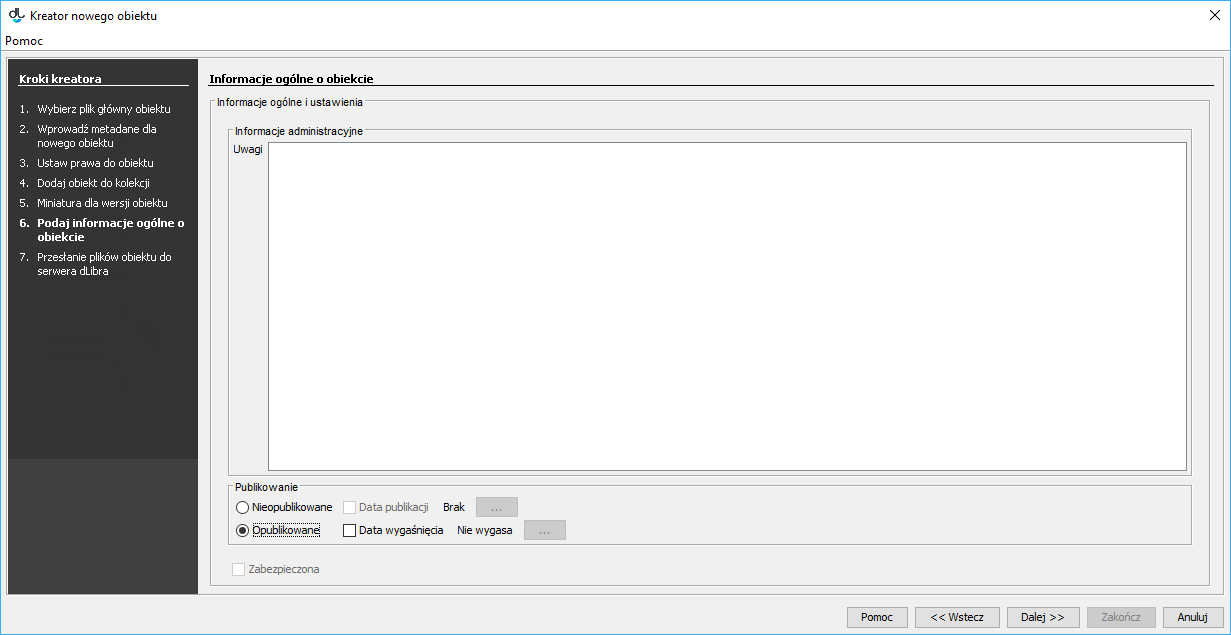
Anchor MiniaturaDlaWersjiObiektu MiniaturaDlaWersjiObiektu - In the sixth step (see the image below), the user can provide some general information about the object, in the following sections:
- “Notes” – administrative information about the object;
- “Publishing” – a panel for determining if the first edition is to be published, determining the date of automatic publication in the future (if applicable), and determining the date of expiry (withdrawal of the edition; if applicable); and
- “Protected” – a checkbox for determining if the object is to be protected against copying (that option only applies to objects which contain files supported by the Reader Application extensions for protecting files).
- Uwagi - są to uwagi administracyjne dotyczące obiektu
- Publikowanie - panel pozwalający na opublikowanie pierwszego wydania (lub określenie daty automatycznej publikacji w przyszłości), a także ustawienie ewentualnej daty jego wygaśnięcia (wycofania wydania)
- Zabezpieczona - pole wyboru pozwalające zabezpieczyć obiekt przed kopiowaniem (dotyczy wyłącznie obiektów zawierających pliki, które są obsługiwane przez rozszerzenia aplikacji czytelnika umożliwiające zabezpieczanie)
Anchor InformacjeOgolneOObiekcie InformacjeOgolneOObiekcie
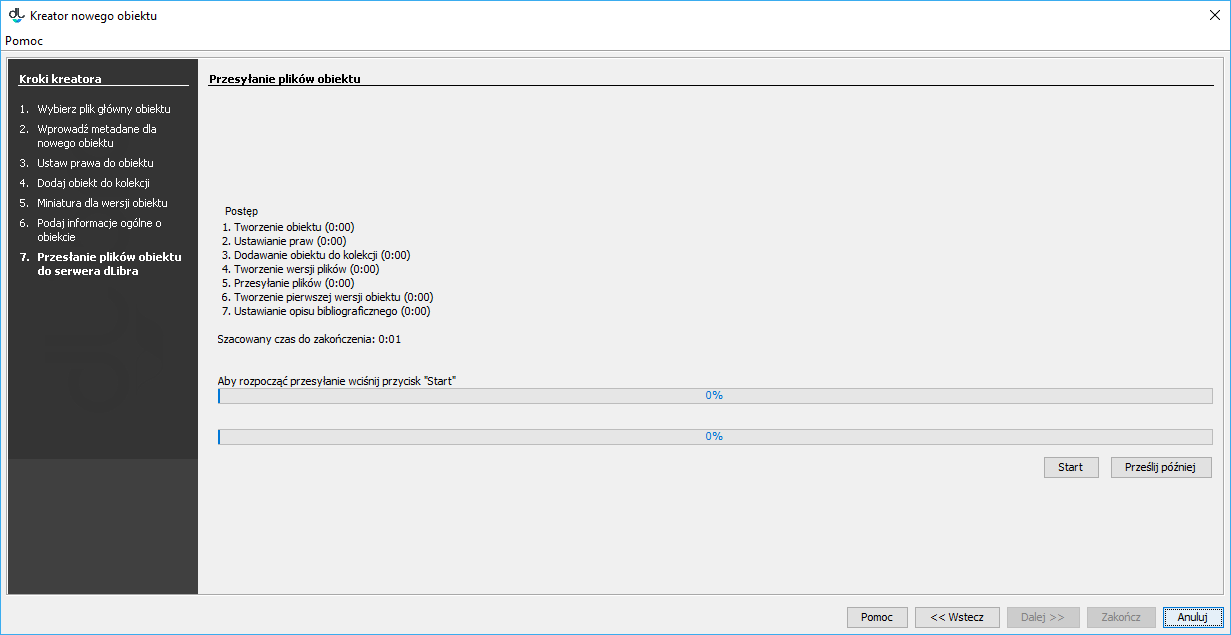
- Przesyłanie plików na serwer jest ostatnim krokiem kreatora obiektu (rysunek poniżej). Aby stworzyć obiekt na serwerze, należy przycisnąć przycisk Start. Proces ten można wstrzymać i wznowić wybierając ponownie ten sam przycisk. W trakcie tworzenia obiektu na panelu Postęp wykazane są wszystkie operacje jakie muszą zostać wykonane w celu poprawnego utworzenia obiektu. Nazwa aktualnie wykonywanej czynności jest zaznaczona pogrubioną czcionką. Dla każdej czynności wyświetlany jest czas (w sekundach) jaki upłynął podczas jej wykonywania. Paski postępu informują o zaawansowaniu wykonywanych czynności. Po utworzeniu obiektu wyświetlane jest krótkie podsumowanie. W trakcie tworzenia obiektu na serwerze możliwe jest anulowanie tej czynności (poprzez zamknięcie okna, np. naciśnięcie przycisku Anuluj). Dodatkowo redaktor może odłożyć proces tworzenia obiektu na później poprzez wybranie przycisku Prześlij później. Po wybraniu przycisku Prześlij później wszystkie informacje związane z obiektem zapisywane są na dysku komputera, a okno kreatora zostaje natychmiast zamknięte. Wszystkie obiekty do wysłania później trafiają na specjalną listę, którą można zarządzać w oknie przesyłania obiektów przeznaczonych do wysłania później. Mechanizm ten opisany jest szczegółowo tutaj). Pozwala on na przygotowanie zestawu obiektu do przesłania, a następnie uruchomienie przesyłania wszystkich obiektów na raz (np. uruchomienie przesyłania pod koniec pracy). Powinno to zwiększyć liczbę przesyłanych obiektów ze względu na to, że redaktor nie musi czekać na przesłanie każdego obiektu ponieważ przesyłanie może odbywać się poza godzinami pracy.
Anchor PrzesylaniePlikowObiektu PrzesylaniePlikowObiektu
...