New object creator – selecting the main file of the object
| Info | ||
|---|---|---|
| ||
Przed przystąpieniem do dodawania obiektu w bibliotece, należy zapisać wszystkie jej pliki na dysku lokalnym komputera, na którym uruchamiana jest aplikacja redaktora. |
Aby stworzyć nową obiekt:
| |
Before adding an object to the library, the user should save all library files on the local drive of the computer on which the Editor Application is run. |
In order to create a new object:
- From the element list, select the directory or group object in which the new object is to be placed.
- From the context menu, select the “New object” function. You can also use the
 button on the toolbar or select an appropriate option from the main menu (“New object...” from the Management menu). After the “New object” function has been selected, the new object creator will be initiated.
 The first step of the new object creator is to define the object content. By default it can be done in three ways, depending on the selected data source.
The first data source is "Standard object", which is a main file selection form known from older versions of dLibra (see the image below). f the object only consists of one file, for example, a PDF document, that file should be selected. If the object consists of many files (for example, HTML files), the startup file for the document should be selected (for HTML, it is usually the index.html file).
If the main object file is in the HTML format, DjVu format, or another format managed by the currently installed extensions, such as fileParser, then the creator will check if all files related to the main file are present and if they are consistent. If it turns out that the selected document is incomplete (files related to the main file are missing), then the transition to the next step will be blocked by default, and the "Warnings..." button can be used to show the list of detected problems. We can decide to purposefully put an inconsistent object in dLibra by clicking the "Ignore warnings" button and moving to the next steps.
All other files from the directory of the main file (not only the object files found by the creator) will be put in the file table. By default, those files are not selected for uploading to the server. Therefore, the user can add files which have not been found by the creator but belong to the object.
Please note: the main file of the object and the related files cannot be deselected. They will always be sent to the server.
The user can additionally modify the type and encoding of a file, in the file tree. Those modifications should only be made when the application does not recognize a file type correctly (the correct value should be entered in the “Type” column). Encoding can only be modified for files which have it (for example, HTML files). If the application does not recognize the encoding of a file correctly, the editor can correct the value by selecting the actual encoding from the expandable list in the “Encoding” column.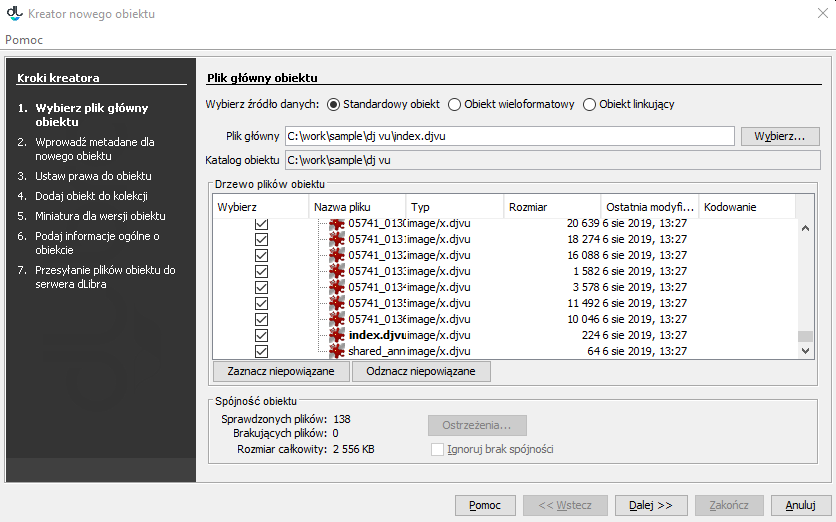
The New Object Creator - a standard main file selection panelThe second data source is called "Multiformat Object" (see the image below) and it's mainly used to create objects that have the same content available in several formats. After clicking the "Select folder" button we need to choose a folder with the prepared files, divided into subfolders with names matching the formats. The formats that can be used depend on the server configuration and by default they are: DjVu, PDF, Galeria, Audio, Wideo, EPUB, MOBI. The recognized formats/folders along with the files within will be visible as a tree. For simplicity, in this mode the application does not try to analyze the file contents in order to choose the associated files - all the files placed in the folders will be included in the object. dLibra also doesn't check the types of files added to specific formats - the Editors need to take care of consistency in that regard in order to not confuse the Readers.
In the "Default format" column the radio button should be checked next to the format that should be presented when the Reader clicks on the "Show content" button without selecting a specific format. In the next oclumn - "Main file" - for each format we can the file that the Reader will pointed to when they select that format (by default the Application tries to guess which of the files is the main one, based on their names).
Nothing prevents us from using the multiformat form to create an object with only one format. The benefit of that over a standard object is that the object will appear in search results with applied filtering by this content format and it will be included in statistics related to that format.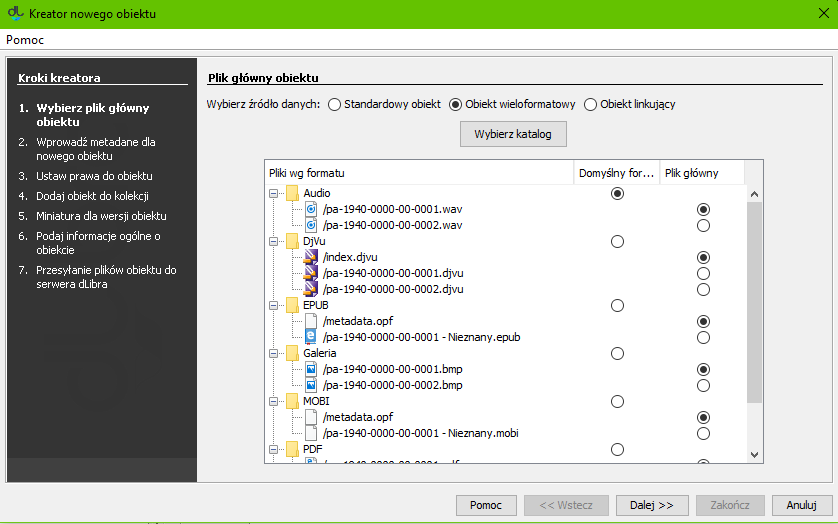
New Object Creator - defining multiformat objectsThe third data source is "Linking Ojbect", which is used to create objects content of which is available somewhere else on the Internet. In that case the dLibra server only stores a small file (names ulr-publication.xml) containing the address of the external resource. When the Reader tries to view the object content, the website behavior depends on the configuration (more precisely, the configuration of ContentBrowserComponent in the WEB-INF/components.xml file): it can show a panel with the external link that the Reader can click on, it can show the external resource directly in an iframe, or it can redirect to the external resource.
To make it possible to find the created object by content, we need to also define URLs of the resources dLibra should use for object indexing. Usually it's enough to copy the main link to the external resource. dLibra is able to index resource of various formats (e.g. PDF, DjVu, HTML), same as with standard objects. Additionally, after the first URL is inserted and selected, the Editor's App content consistency check mechanism can be used to automatically add associated files (e.g. all the pages of a DjVu document or links in an HTML document) - it's invoked with the "Find related resources" button.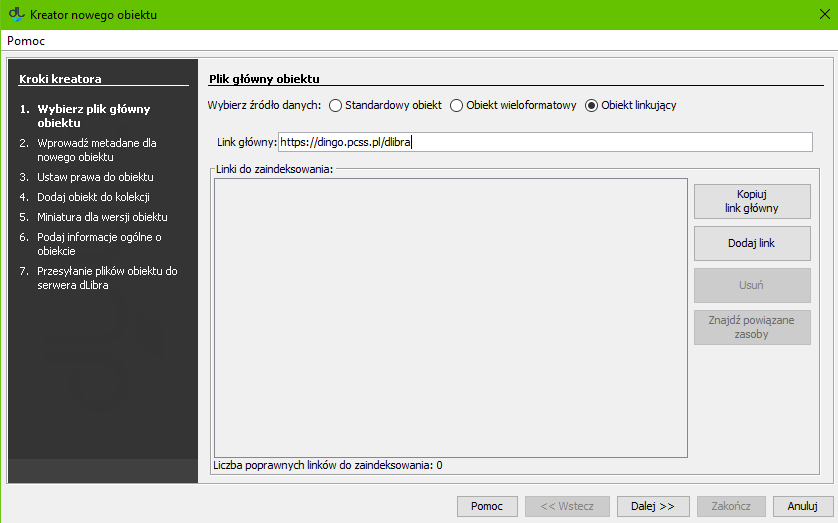
Kreator nowego obiektu - wprowadzanie obiektu linkującego
In the second step (see the image below), the user should describe the new object with the use of a set of attribute values. For details about it, see the Bibliographic Description Editor chapter. In order to be able to go to the next step, the user must enter the name of the new object (in the “Name” field). By default, the name is created on the basis of the bibliographic description, by combining the name of the author and the date of edition (for information about changing the method of creating a default name, see the Configuring the Editor Application section. For example, if the title is “Fables”, the author is “John Smith”, and the date of edition is “2004”, then the name will be “John Smith, 2004, Fables” – with the author first, followed by the date of edition and the title. Whenever a user changes the bibliographic description, the name is updated. Off course, a user can also enter a different name or modify the default name. In such a case, the automatic update will be blocked. In order to proceed to the next step of the creator, the user should click the “Next” button.Anchor newPublicationWizardMetadataStep newPublicationWizardMetadataStep Anchor newPublicationWizardMetadata newPublicationWizardMetadata 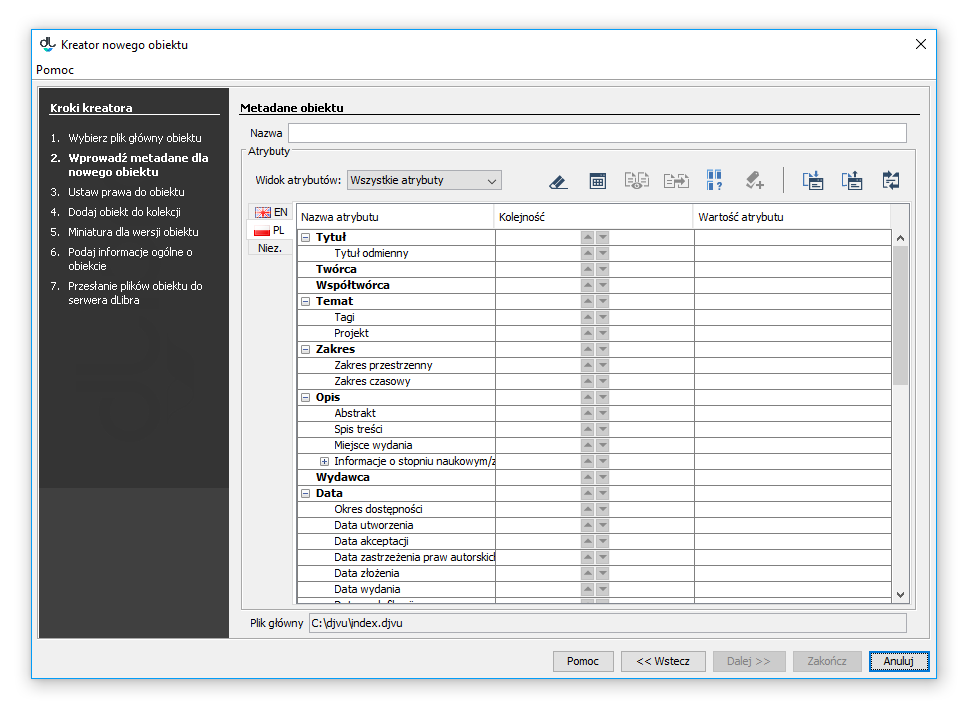
New object creator – assigning attribute values
Anchor newPublicationWizardRightsStep newPublicationWizardRightsStep The third step (see the image below) is to assign access permissions for the object to users. Permission assignment is described in the part about the permission editor. In order to proceed to the next step of the creator, the user should click the “Next” button.
Anchor newPublicationWizardUsersRights newPublicationWizardUsersRights 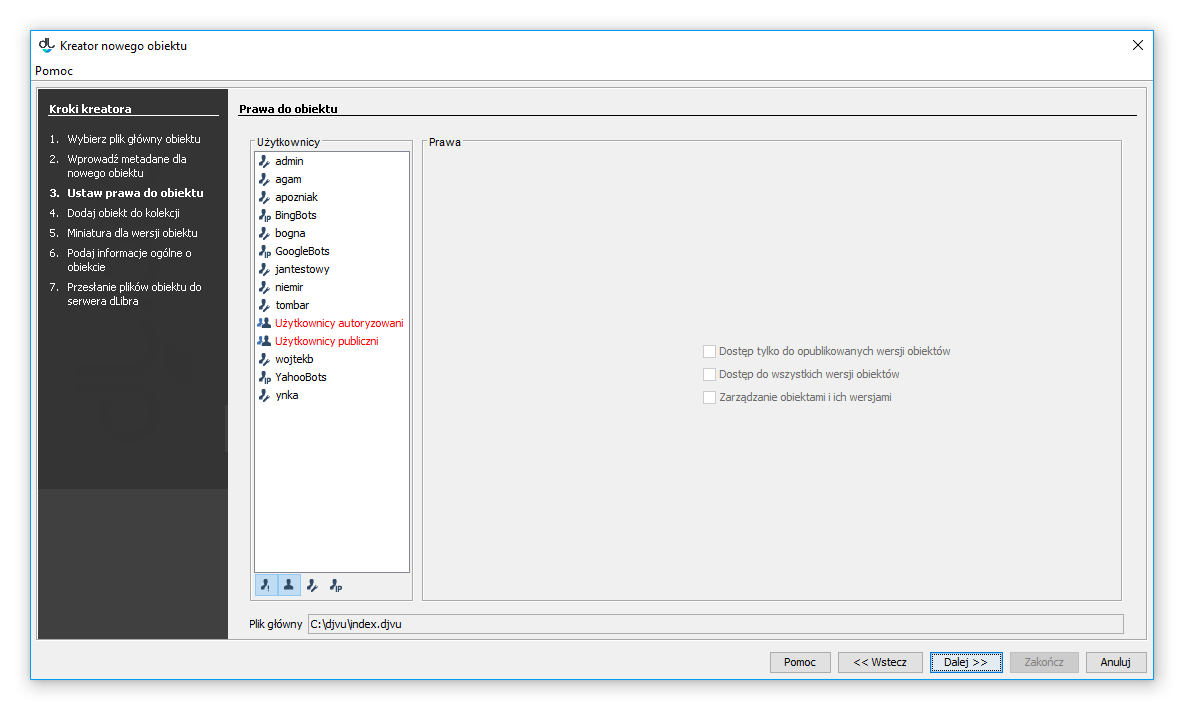 New object creator – assigning permissions for the object to users
Anchor newPublicationWizardCollectionsStep newPublicationWizardCollectionsStep In the fourth step (see the image below), the user should assign the object to a collection. The way to do that is described in detail in the section about the Editor for Assigning Objects to Collections. In order to proceed to the next step of the creator, the user should click the “Next” button.
Anchor newPublicationWizardColls newPublicationWizardColls 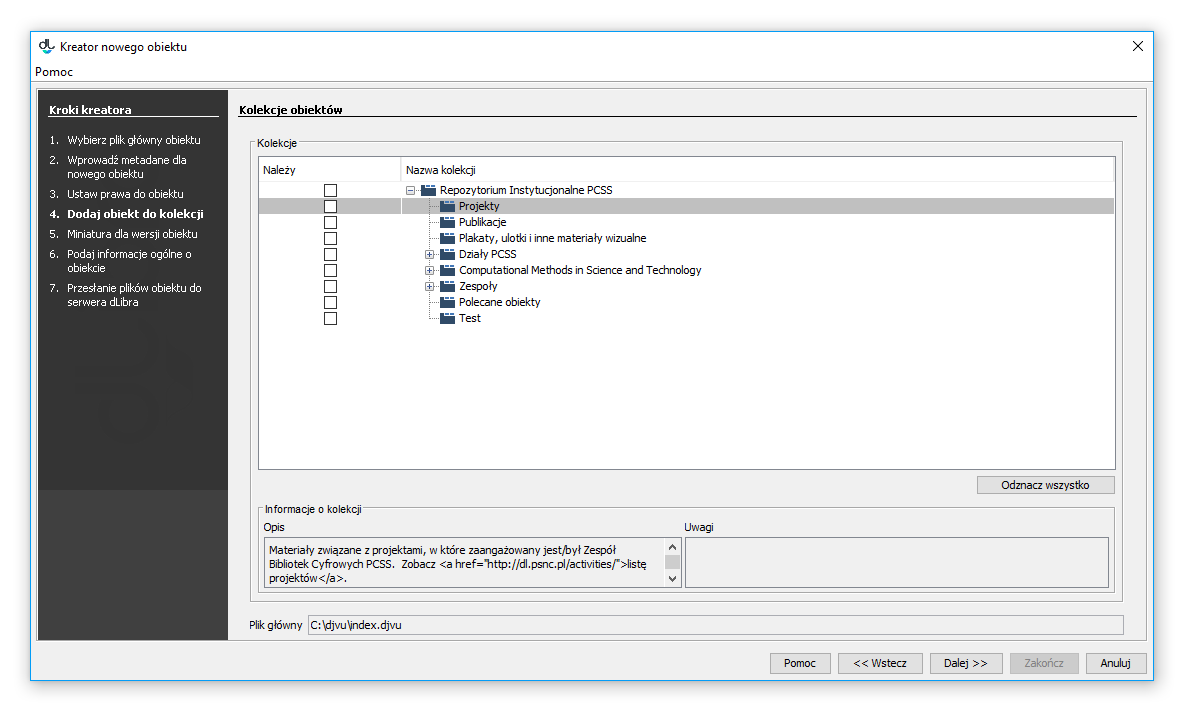 New object creator – adding an object to a collection
In the fifth step (see the image below), the user can choose the thumbnail for the first edition of the object.
A thumbnail is a graphical representation of an edition; it is shown to web page users next to the information about the edition. In order to upload a thumbnail from a graphics file on the drive, the user should click the “Select” button and indicate the file. If there is an extension of the miniatureProvider type installed in the application and if it supports the file types selected in the first step of the creator, the application will be able to automatically generate thumbnail suggestions. For that purpose, the user should click the “From object files” button. If the application has generated many thumbnails, the user can select the correct one by indicating its number on the expandable list (thumbnail numbers usually correspond to the numbers of the pages of the object) or review the subsequent thumbnails by clicking the “Previous page” and “Next page” options. The user can also paste an image from the clipboard (with the use of the “Paste” button). If the application is configured properly, it will automatically reduce the thumbnail size to the required size (for the configuration details, see here). The user can also make the thumbnails bigger or smaller by clicking the buttons labeled + and -.
In order to proceed to the next step of the creator, the user should click the “Next” button.
Anchor newPublicationWizardWWW newPublicationWizardWWW 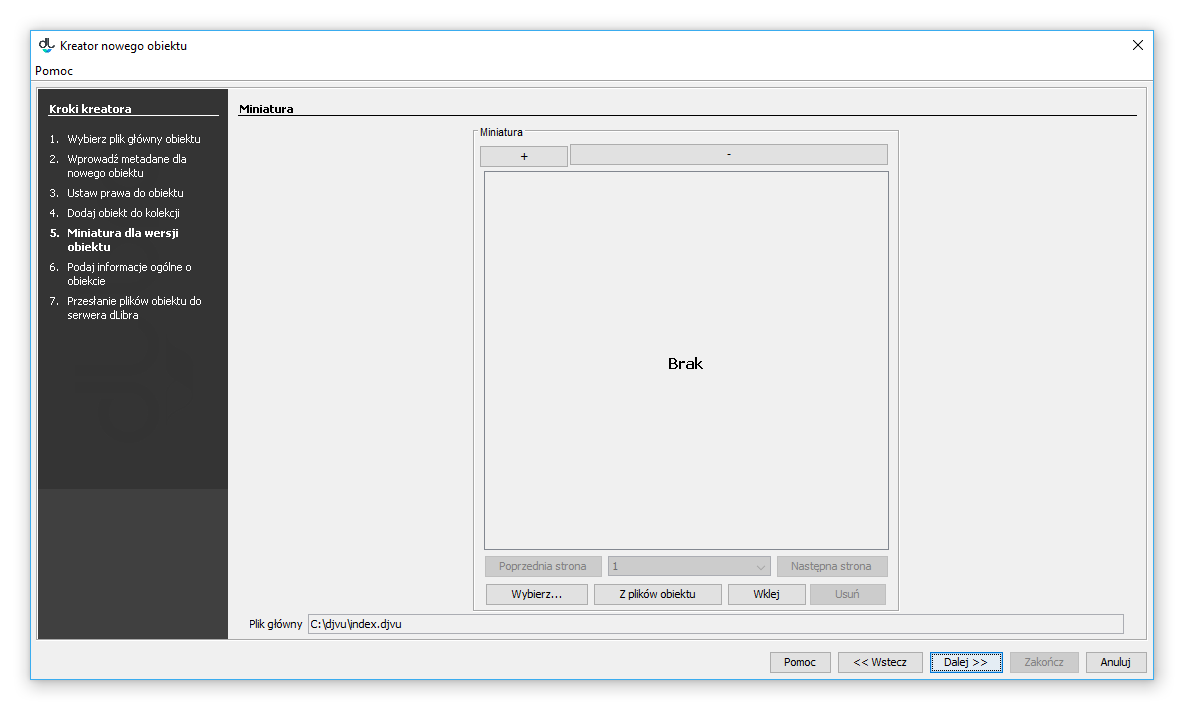 New object creator - thumbnail panel
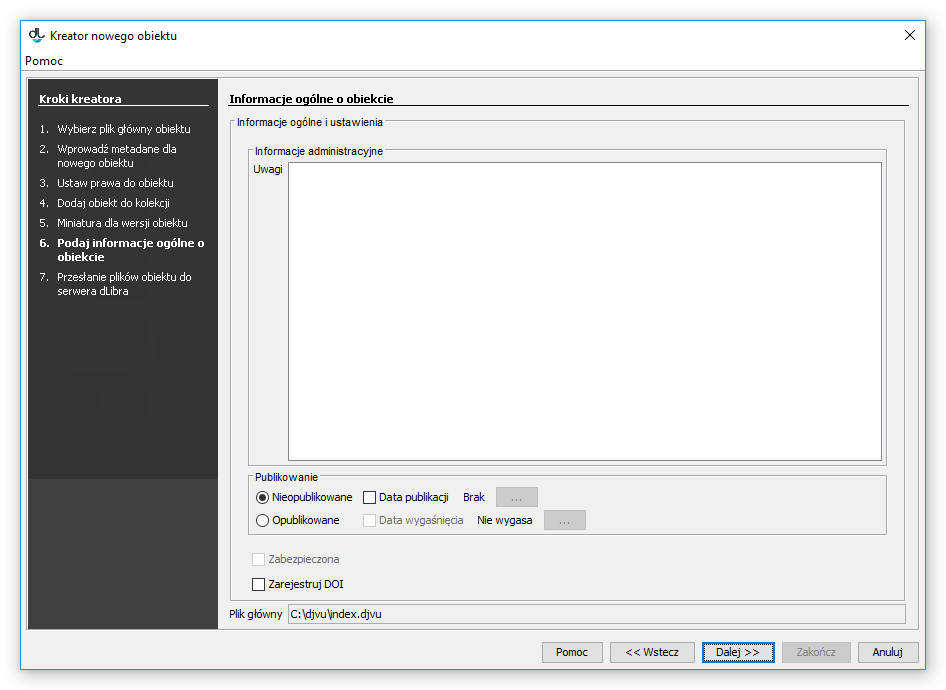
- In the sixth step (see the image below), the user can provide some general information about the object, in the following sections:
- “Notes” – administrative information about the object;
- “Publishing” – a panel for determining if the first edition is to be published, determining the date of automatic publication in the future (if applicable), and determining the date of expiry (withdrawal of the edition; if applicable);
“Protected” – a checkbox for determining if the object is to be protected against copying (that option only applies to objects which contain files supported by the Reader Application extensions for protecting files); and
“Register a DOI” – a checkbox for registering a DOI (a digital object identifier) for the object; that option has been available in the dLibra system since version 6.1; for more information about DOIs, see chapters Configuring DOI and Registering DOIs in the DataCite System.
New object creator – information about the object
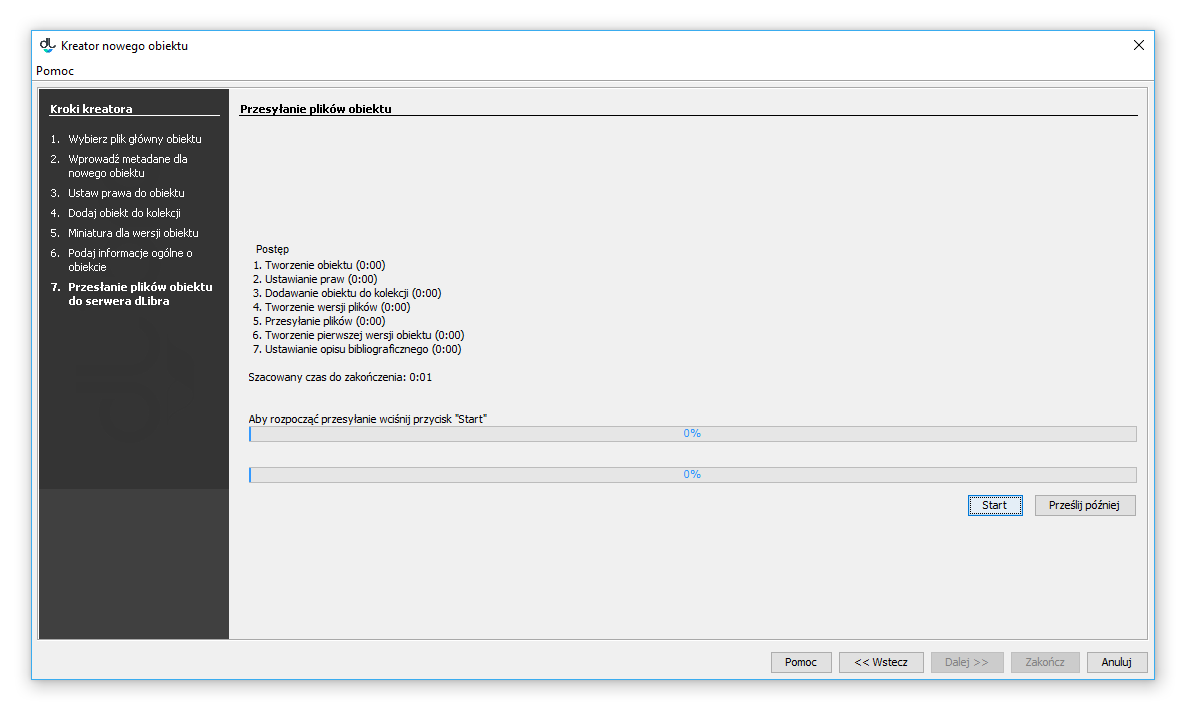
In the last step of the creator, the object files are sent to the server (see the image below). In order to create an object on the server, the user should click the “Start” button. That process can be paused and resumed by clicking the same button again. While the object is being created, all operations which have to be performed for the object to be created correctly are displayed on the “Progress” panel. The name of the operation being performed at the moment is in bold. For every operation, the program displays the time (in seconds) which has elapsed since the beginning of that operation. Progress bars show the user how advanced the performed operations are. Once the object has been created, a short summary is displayed. While the object is being created on the server, the operation can be canceled (by closing the window, for example, by clicking the “Cancel” button). Also, the editor can postpone the process of object creation by clicking the “Send later” button. When that button is clicked, all information related to the object is saved on the computer drive, and the creator window is immediately closed. All objects which are to be sent later are put on a special list which can be managed in the window for sending such objects. That mechanism is described in detail here. It makes it possible to prepare a set of objects for sending and then to start up the sending of all of them together (for example, to start up the sending at the end of one’s work). One advantage of it is the ability to potentially send more objects – the editor will not have to wait through the sending process because the files can be sent after working hours.
New object creator – creating an object on the server
- Na liście elementów należy wybrać katalog lub obiekt grupowy, w którym ma się znaleźć nowy obiekt.
- Z menu podręcznego należy wybrać funkcję Nowy obiekt. Można również użyć przycisku na pasku narzędzi lub wybrać odpowiednią opcję z menu głównego (Nowy obiekt... z menu Zarządzanie). Po wybraniu funkcji Nowy Obiekt... zostanie uruchomiony kreator nowego obiektu.
- Pierwszym krokiem kreatora nowego obiektu jest wybór pliku głównego obiektu (rysunek poniżej). Jeśli obiekt składa się z jednego pliku, np. w formie dokumentu PDF, należy wybrać ten plik. Jeśli obiekt jest złożony z wielu plików (np. HTML), należy wybrać plik startowy dokumentu (dla HTML jest to zwykle index.html).
Jeśli główny plik obiektu jest w formacie HTML, DjVu lub innym formacie obsługiwanym przez aktualnie zainstalowane rozszerzenia typu fileParser, kreator sprawdzi, czy obecne są wszystkie pliki powiązane z plikiem głównym i czy są one spójne. Jeżeli okaże się, że wybrany dokument jest niekompletny (brakuje plików powiązanych z plikiem głównym) przejście do kolejnego kroku zostanie domyślnie zablokowane a przycisk Ostrzeżenia... będzie aktywny (przyciśnij przycisk Ostrzeżenia aby zobaczyć listę ostrzeżeń). Istnieje jednak możliwość przejścia do następnego kroku po zaznaczeniu opcji Ignoruj ostrzeżenia. Zaznaczając tę opcję zgadzamy się na umieszczenie w bibliotece niespójnego obiektu. Wszystkie znalezione przez kreator pliki zostaną zaznaczone do przesłania na serwer.
Poza plikami obiektu znalezionymi przez kreator w tabeli plików umieszczone zostaną wszystkie inne pliki znajdujące się w katalogu pliku głównego. Pliki te domyślnie nie są zaznaczone do przesłania na serwer. Możliwe jest zatem dodanie plików, które nie zostały znalezione przez kreator, a należą do obiektu.
Uwaga! Pliku głównego obiektu oraz plików z nim powiązanych nie da się odznaczyć. Będą one zawsze wysłane na serwer.
Na drzewie plików obiektu można dodatkowo modyfikować typ pliku oraz jego kodowanie. Modyfikacje typu powinno się wykonywać tylko wtedy gdy aplikacja niepoprawnie rozpozna typ pliku (należy wprowadzić poprawną wartość w kolumnie Typ). Modyfikacje kodowania możliwe są tylko dla plików, które takie kodowanie posiadają (np. HTML). Jeśli aplikacja niepoprawnie rozpozna kodowanie redaktor może poprawić tę wartość wybierając poprawne kodowanie z listy rozwijanej w kolumnie Kodowanie.
Aby przejść do następnej strony, należy kliknąć na przycisk Dalej.Anchor newPublicationWizardMainFile newPublicationWizardMainFile 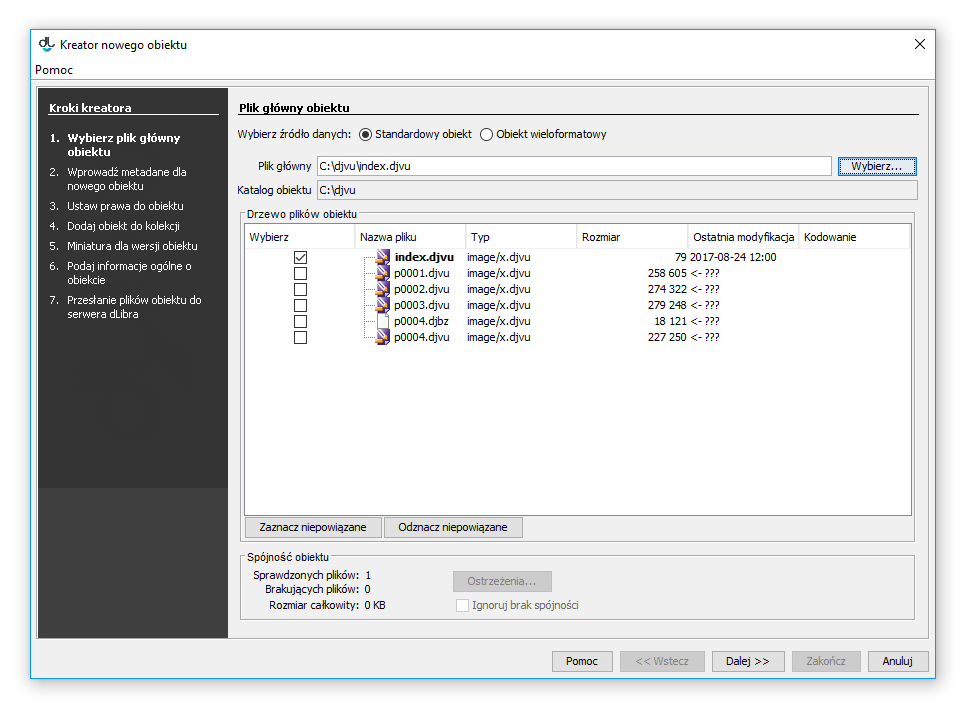 Kreator nowego obiektu - wybór głownego pliku obiektu
Anchor newPublicationWizardMetadataStep newPublicationWizardMetadataStep Od wersji 6.0 w systemie dLibra istnieje możliwość dodawania obiektów wieloformatowych. Więcej na ten temat można przeczytać w rozdziale poświęconym obiektom wieloformatowym: 04. Tworzenie i modyfikowanie obiektów wieloformatowych
W drugim kroku (rysunek poniżej) należy opisać przyszły obiekt zestawem wartości atrybutów. Szczegóły znajdują się w rozdziale edytor opisu bibliograficznego. Aby możliwe było przejście do kolejnego kroku musi być podana nazwa obiektu (pole oznaczone etykietą Nazwa). Domyślnie nazwa ta tworzona jest na podstawie opisu bibliograficznego przez połączenie tytułu autora i daty wydania (informacje o zmianie sposobu tworzenia domyślnej nazwy zawarte są w sekcji konfiguracja). Przykładowo jeśli tytuł to "Bajki", autor "Jan Kowalski" a data wydania "2004" - nazwą będzie "Jan Kowalski, 2004, Bajki" najpierw autor, później data wydania a na końcu tytuł. Za każdym razem kiedy użytkownik zmienia opis bibliograficzny nazwa jest aktualizowana. Możliwe jest oczywiście wprowadzenie innej nazwy lub modyfikacja domyślnej nazwy, co zablokuje automatyczną aktualizację po zmianie opisu. Aby przejść do kolejnego kroku kreatora należy nacisnąć przycisk Dalej.Anchor newPublicationWizardMetadata newPublicationWizardMetadata Kreator nowego obiektu - przypisywanie wartości atrybutówAnchor newPublicationWizardRightsStep newPublicationWizardRightsStep Trzecim krokiem (rysunek poniżej) jest nadanie użytkownikom praw do obiektu. Nadawanie praw opisane jest w części dotyczącej edytora praw. Aby przejść do kolejnego kroku kreatora należy nacisnąć przycisk Dalej.Anchor newPublicationWizardUsersRights newPublicationWizardUsersRights Kreator nowego obiektu - nadawanie użytkownikom praw do obiektuAnchor newPublicationWizardCollectionsStep newPublicationWizardCollectionsStep Czwartym krokiem kreatora (rysunek poniżej) jest przypisywanie obiektu do kolekcji. Mechanizm ten jest dokładnie opisany w części dotyczącej edytora przynależności do kolekcji. Aby przejść do kolego kroku kreatora należy nacisnąć przycisk Dalej.Anchor newPublicationWizardColls newPublicationWizardColls Kreator nowego obiektu - dodawanie obiektu do kolekcji
W piątym kroku kreatora nowego obiektu (rysunek poniżej) mamy możliwość wybrania miniatury dla pierwszego wydania obiektu.
Miniatura - graficzna reprezentacja wydania widoczna dla użytkowników stron WWW przy informacjach na temat wydania. Aby wczytać miniaturę z pliku graficznego na dysku, kliknij przycisk Wybierz i wskaż plik. Jeśli w aplikacji zainstalowane jest rozszerzenie typu miniatureProvider obsługujące pliki wybrane w pierwszym kroku kreatora, aplikacja może automatycznie wygenerować propozycje miniatur. W tym celu należy kliknąć przycisk Z plików obiektu. Jeśli możliwe jest wygenerowanie wielu miniatur, właściwą miniaturę można wybrać poprzez wskazanie jej numeru na liście rozwijalnej (numery miniatur zazwyczaj odpowiadają numerom stron w obiekcie), lub przejrzeć kolejne miniatury, klikając na Poprzednia strona lub Następna strona. Można również wkleić obrazek ze schowka systemowego (przycisk Wklej). Jeśli aplikacja jest odpowiednio skonfigurowana, wybrane miniatury są automatycznie zmniejszane do wymaganych rozmiarów (szczegóły konfiguracji znajdują się tutaj). Miniatury wygenerowane z plików obiektu można dodatkowo powiększać lub zmniejszać, klikając na przyciski oznaczone znakami + i -.
Aby przejść do kolejnego kroku kreatora należy nacisnąć przycisk Dalej.Anchor newPublicationWizardWWW newPublicationWizardWWW Kreator nowego obiektu - informacje WWW
Krok szósty (rysunek poniżej) umożliwia podanie trzech informacji: - Uwagi - Informacje administracyjne dotyczące obiektu.
- Publikowanie - Panel pozwalający na opublikowanie pierwszego wydania lub określenie daty automatycznej publikacji w przyszłości, a także ustawienie ewentualnej daty jego wygaśnięcia (wycofania wydania).
Zabezpieczona - Pole wyboru pozwalające zabezpieczyć obiekt przed kopiowaniem (dotyczy wyłącznie obiektów zawierających pliki, które są obsługiwane przez rozszerzenia aplikacji czytelnika umożliwiające zabezpieczanie).
Zarejestruj DOI - Pole wyboru pozwalające zarejestrować identyfikator cyfrowy(DOI). Opcja dostępna w systemie dLibra od wersji 6.1. Więcej na temat DOI można znaleźć w rozdziałach: [EN] Configuring DOI oraz Rejestracja DOI w systemie DataCite.
Kreator nowego obiektu - informacji o obiekcie
Przesyłanie plików na serwer jest ostatnim krokiem kreatora nowego obiektu (rysunek poniżej). Aby stworzyć obiekt na serwerze, należy przycisnąć przycisk Start. Proces ten można wstrzymać i wznowić wybierając ponownie ten sam przycisk. W trakcie tworzenia obiektu na panelu Postęp wykazane są wszystkie operacje jakie muszą zostać wykonane w celu poprawnego utworzenia obiektu. Nazwa aktualnie wykonywanej czynności jest zaznaczona pogrubioną czcionką. Dla każdej czynności wyświetlany jest czas (w sekundach) jaki upłynął podczas jej wykonywania. Paski postępu informują o zaawansowaniu wykonywanych czynności. Po utworzeniu obiektu wyświetlane jest krótkie podsumowanie. W trakcie tworzenia obiektu na serwerze możliwe jest anulowanie tej czynności (poprzez zamknięcie okna, np. naciśnięcie przycisku Anuluj). Dodatkowo redaktor może odłożyć proces tworzenia obiektu na później poprzez wybranie przycisku Prześlij później. Po wybraniu przycisku Prześlij później wszystkie informacje związane z obiektem zapisywane są na dysku komputera, a okno kreatora zostaje natychmiast zamknięte. Wszystkie obiekty do wysłania później trafiają na specjalną listę, którą można zarządzać w oknie przesyłania obiektów przeznaczonych do wysłania później. Mechanizm ten opisany jest szczegółowo tutaj). Pozwala on na przygotowanie zestawu obiektów do przesłania, a następnie uruchomienie przesyłania wszystkich obiektów na raz (np. uruchomienie przesyłania pod koniec pracy). Powinno to zwiększyć liczbę przesyłanych obiektów ze względu na to, że redaktor nie musi czekać na przesłanie każdego obiektu, ponieważ przesyłanie może odbywać się poza godzinami pracy.
Kreator nowego obiektu - tworzenie obiektu na serwerze| Anchor | ||||
|---|---|---|---|---|
|
...