...
Attribute Value Editor
| Info | ||
|---|---|---|
| ||
Wartości wprowadzane w edytorze opisu nie powinny standardowo zawierać tagów HTML (np. |
| Info | ||
|---|---|---|
| ||
One value of an attribute can be a URL (http, web address). On the website, a URL entered as a value will be replaced with a link: instead of the URL, the website viewer will see the “click here to go to the page” text which, when clicked, will take the user to the entered URL address. Also, a text can be added to a URL (after the URL) which is provided as a value. For example, if the user types in: http://www.psnc.pl |
...
| Anchor | ||||
|---|---|---|---|---|
|
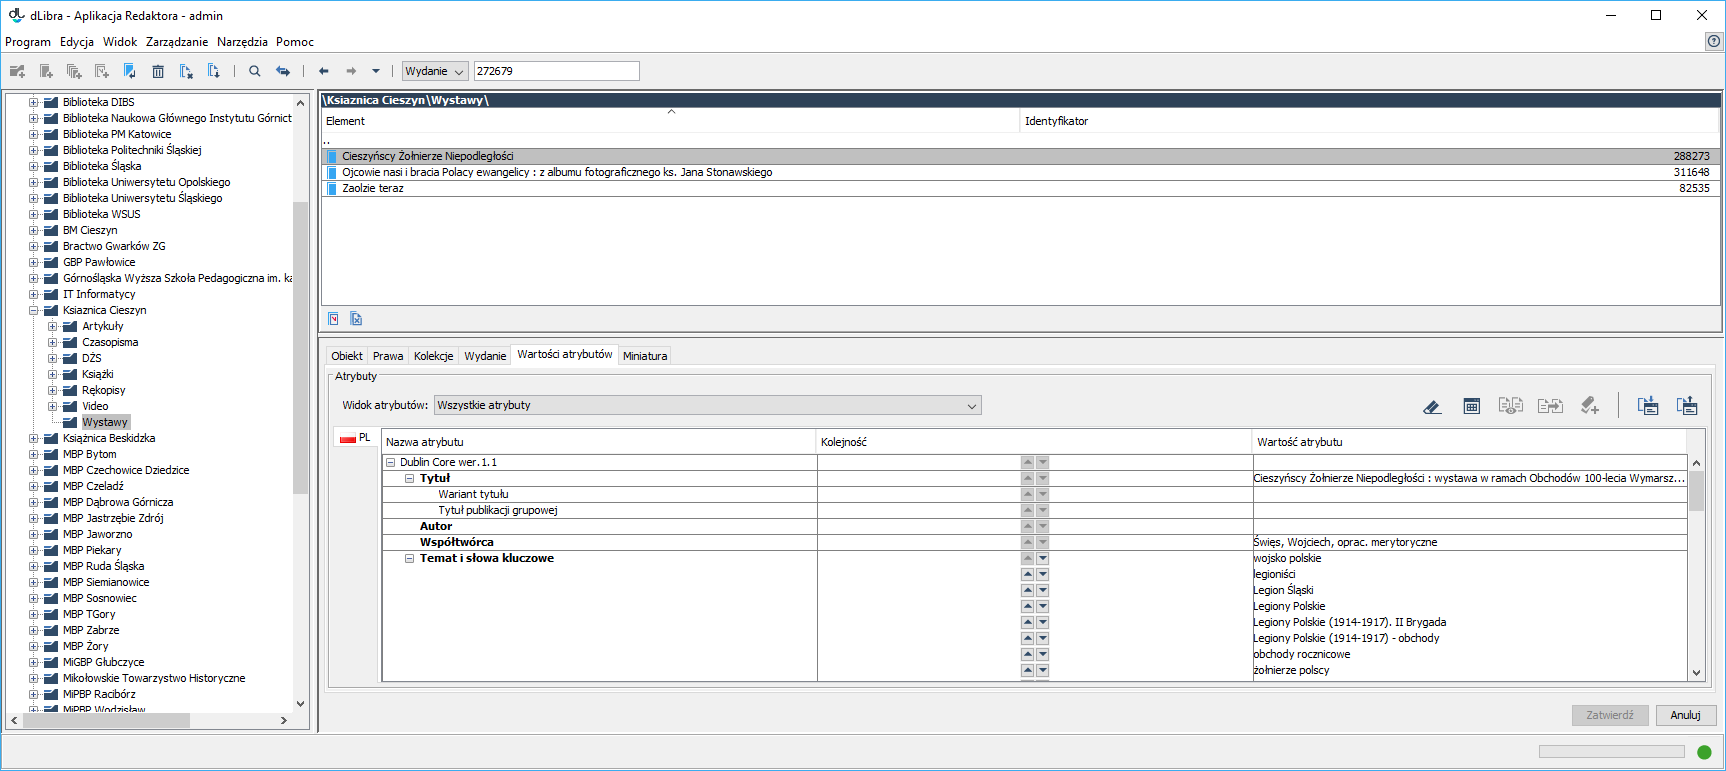
Edytor wartości atrybutów
Edytor wartości atrybutów jest dostępny na zakładce Wartości atrybutów. Umożliwia on wprowadzanie metadanych. Edytor ma formę tabeli w której wyszczególnione są trzy kolumny. W lewej kolumnie znajduje się drzewo atrybutów. Po przytrzymaniu kursora myszy nad wybranym atrybutem pojawi się dymek z jego opisem, o ile jest dostępny. W prawej kolumnie wyświetlane są wartości przypisane do atrybutu. Każdy atrybut może mieć wiele wartości. Każda wartość wyświetlana jest w osobnym wierszu poczynając od wiersza w którym znajduje się nazwa atrybutu. Jeżeli atrybut nie ma żadnych wartości to pole po prawej stronie nazwy atrybutu jest puste. W środkowej kolumnie umieszczone są kontrolki umożliwiające zmianę kolejności wartości. Są one aktywne tylko wtedy, gdy do danego atrybutu przypisano więcej niż jedną wartość. Kliknięcie w wybranym wierszu na przycisku ze strzałką skierowaną w górę spowoduje przesunięcie wartości widocznej w tym wierszu o jedną pozycję wyżej. Analogicznie, kliknięcie na przycisku ze strzałką skierowaną w dół przeniesie wybraną wartość o jedną pozycję niżej.
Aby dodać wartość do atrybutu który nie ma przypisanej żadnej wartości należy:
- Wybrać puste pole po prawej stronie nazwy atrybutu (np. klikając na nie myszką) do którego chcemy dodać wartość
- Wpisać żądaną wartość atrybutu
- Zatwierdzić wartość przyciskając klawisz ENTER
Aby dodać wartość atrybutu w przypadku gdy jest już co najmniej jedna wartość należy:
- Wybrać dowolne pole z wartością atrybutu do którego chcemy dodać kolejną wartość
- Przycisnąć klawisz TAB przez co zostanie dodany nowy wiersz, poniżej wybranej wcześniej wartości
- Wpisać żądaną wartość atrybutu
- Zatwierdzić wartość przyciskając klawisz ENTER
Podczas wpisywania wartości atrybutu możliwe jest w każdym momencie wciśnięcie klawisza TAB . Spowoduje to dodanie aktualnej wartości do wartości atrybutów i stworzenie nowego wiersza w który można wprowadzać kolejną wartość.
Jeżeli atrybut, dla którego wprowadzana jest wartość, ma już zdefiniowane wartości rozpoczynające się takimi samymi znakami jakie są wprowadzane, to zostanie uruchomiony mechanizm autouzupełniania. Mechanizm autouzupełniania wyświetla listę wartości (rysunek poniżej) które rozpoczynają się na wpisaną frazę. Jeżeli interesująca nas wartość jest na liście, możliwy jest jej bezpośredni wybór (np. przez dwukrotne kliknięcie myszką na wartość lub zaznaczenie pozycji przy pomocy klawiszy strzałek i naciśnięcie ENTER). Jeśli atrybut, dla którego wprowadzana jest wartość, jest oznaczony jako kontrolowany, a zalogowany użytkownik nie ma przyznanego prawa do zarządzania takimi atrybutami, wybór elementu z listy autouzupełniania jest jedynym sposobem na wprowadzenie wartości (nie można wprowadzać do opisu nowych wartości spoza słownika kontrolowanego).
...
Attribute value editor
The attribute value editor is located in the “Attribute value” tab. It allows the user to enter metadata. The editor has the form of a table with three columns. In the left column, there is an attribute tree. When the cursor is held over a selected attribute, there appears a tooltip with a description of the attribute (if it is available). In the right column, the values assigned to the attribute are displayed. Every attribute can have many values. Every value is displayed in a separate row, beginning with the row in which there is the attribute name. If an attribute does not have any values, the field on the right side of the attribute is empty. The middle column contains control elements for changing the value order. They are only active for attributes with more than one value. A value can be moved one position higher by clicking the button with an arrow pointing upward in the value row. Similarly, clicking the button with an arrow pointing downward will move the selected value one position lower.
In order to add a value to an attribute to which no values have been assigned yet, the user should:
- select (for example, by clicking it) the empty field on the right side of the attribute name to which a value is to be added,
- enter the desired attribute value, and
- confirm the value by clicking the “Enter” key.
In order to add an attribute value when there already exists at least one value, the user should:
- select a field with a value of the attribute to which another value is to be added,
- press the “Tab” key, which will cause a new row to appear below the selected value,
- enter the desired attribute value, and
- confirm the value by clicking the “Enter” button.
While entering an attribute value, the user can press the “Tab” key at any moment to add the value to the attribute values and, at the same time, create a new row in which another value can be added
If the attribute for which a value is being entered already has some values which begin with the same characters as the ones that are being entered, the autocomplete mechanism will be activated. That mechanism displays a list of values (as shown in the image below) which begin with the entered phrase. If the value which the user wants to enter is there on the list, it can be selected directly (for example, by double-clicking the value or by selecting it with the use of arrow keys and then pressing the “Enter” key). If the attribute for which a value is being entered is marked as controlled, and the logged in user does not have a permission to manage such attributes, the only way to enter the value is to select the desired element from the autocomplete list (new values, from outside of the controlled dictionary, will not be allowed).
| Anchor | ||||
|---|---|---|---|---|
|

The attribute value list displayed by the autocomplete mechanism
Attribute values can be removed from the attribute value list. That is done by selecting a single value from the list and clicking the “Delete” key – the value will be removed from the bibliographic description. If the given value field only contained one value, it will be cleared; if it contained more values, then only the row with the selected value will be deleted.
Attribute Views
Although particular editors usually only fill in a small number of the numerous available attributes, many implementations have very complex attribute schemas, especially if they are intended for storing objects of various types – and every type of object requires a slightly different set of attributes, for example, scientific works require attributes related to the journal in which they are published (the name, publishing house, year of publication, and issue number), and maps require the time and place they pertain to.
In such a situation, the attribute view mechanism comes in handy. The editor working with objects of a particular type can select an appropriate view so that only the attributes assigned to that view are visible in the editor, and other attributes are hidden (see the image below). It can also be determined which attributes are to be required for a view (that is, the values of which attributes will have to be filled in by an editor). An attribute view can be selected from the expandable menu located just above the attribute editor. For detailed information about attribute views and their configuration, see here.
| Anchor | ||||
|---|---|---|---|---|
|

A simple example of how attribute views work
| Anchor | ||||
|---|---|---|---|---|
|
Synonym Dictionaries
As has been mentioned above, metadata are supported by the mechanism of synonyms (for detailed information about it, see here). The metadata editor makes it possible to introduce synonyms for a value selected in the metadata table. In order to add synonyms to a selected value, the user should click the “Add synonyms” button (see below) or select the Ctrl+S key combination. As a result, the synonym window for the selected value will appear (see the image below).
| Anchor | ||||
|---|---|---|---|---|
|

The synonym window
The synonym window consists of two panels: the upper one (“Current synonyms”) shows the existing value synonyms, and the lower one (“New synonyms”) is for entering new synonyms and for deleting synonyms. In order to add the first synonym, the user just has to enter the value on the list of new synonyms, in the “New synonyms” panel. In order to add another synonym, the user has to click the “Add” button and enter the value in the newly created item. In order to delete a synonym, the user should select the value to be deleted and click the “Delete” button. Synonym changes have to be confirmed by clicking the “Confirm” button or canceled by clicking the “Cancel” button.
Caution! The edited attribute values of the selected element will only be saved if the user presses the “Confirm” button in the lower right-hand corner of the property window.
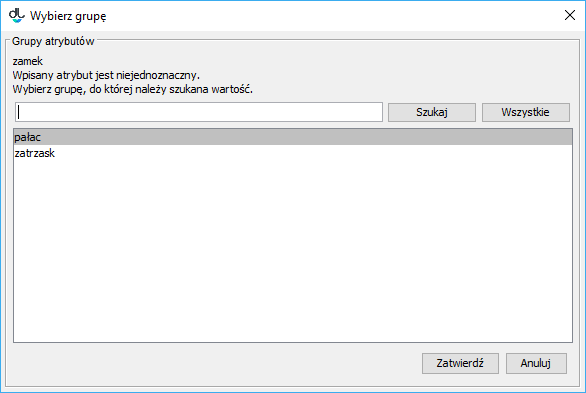
If the bibliographic description contains an ambiguous value, the user must select its correct meaning. For that purpose, the application displays the value group selection window (see the image below) in which the user can select the group (meaning) to which the ambiguous value belongs. Example: Let us assume that there is value “spring” in a bibliographic description and that there are two value groups in the dLibra system which contain the “spring” value: the “season” group and the “device” group. The user must decide whether the “spring” in question is a season or a device in the given case.
| Anchor | ||||
|---|---|---|---|---|
|
Wybór grupy dla podanej wartości
The Language of a Bibliographic Description and Values Independent of Language
A bibliographic description is dependent on language, which means that it can be entered by the user in various languages (as long as more than 1 language is defined in the system). In order to see/modify a description in a particular language, the user should select an appropriate tab in the attribute value editor. Language tabs are labeled with two-letter abbreviations of the names of the languages available in the system, accompanied by graphic representations of those languages (flag pictograms).
Let us assume that we are entering bibliographic descriptions in English and Polish to the library. In order to enter the author of an item in both languages, we would have to enter the same (author) value for both languages. Then, if we wanted to modify that value at a later time, we would have to do it twice (once for each language). But the author value is the same for each language (it is language-independent). It is for such cases – for ease of value entering/modifying when a value is the same for all languages – that a special language for independent values (marked “Indep.” in tabs) has been introduced to the dLibra system. That language is only available to the editor (there is no description in the independent language on the website). Values entered in that language are automatically added to descriptions in other languages before those descriptions are displayed on the website.
For example, let us assume that we have used the language of independent values to enter the value of the “Title” attribute for edition A. A person viewing the web page of edition A will be able to see the title value in descriptions in every other language. It is worth noting at this point that values entered in the independent language are added to values in other languages – they do not replace them.
Auxiliary Tools
Over the bibliographic description table, there is a set of buttons for additional operations on metadata. They are (beginning from the left side):
 – clears the metadata editor (removes all entered values); all values entered in the currently edited description are deleted.
 – displays the edited metadata in a separate window (for more comfortable viewing of them when they contain very long values).
 – displays those values in the metadata table which are inherited (those values are displayed in red; they cannot be modified, and the user cannot add values to an attribute which has an inherited value); that button is not active if the given element cannot inherit metadata (if it is not in a group object).
 – copies all inherited values to the description (the inherited values are added directly to the metadata of the element); that button is not active if the given element cannot inherit metadata (if it is not in a group object).
 ,
,  ,
,  lub
lub  – searches for potential duplicates in the FBC service (the Digital Library Federation of the PIONIER network – http://fbc.pionier.net.pl) on the basis of the values entered in the description; the button is only visible when new elements are being created (for example, in the new object creator); the attributes the values of which are used for searching for duplicates are displayed in bold; while a bibliographic description is being entered, the application automatically checks if there are potential duplicates and, depending on the result of the search, updates the icon displayed on the button, as follows:
- – means that the values entered in the description are not sufficient for determining with adequate precision if there are potential duplicates; that icon also appears while the application is performing the operation of searching for duplicates or when the FBC system is not available;
- – means that the application has not found any potential duplicates;
- – means that there are potential duplicates, but the search query was not complete (because not all attributes taken into account during the search have values), so the result is only approximate;
- – means that there are potential duplicates and that the search query was complete (values have been entered for all attributes taken into account during the search), so it is highly probable that the found elements are, indeed, duplicates
...
Lista wartości atrybutu wyświetlana przez mechanizm autouzupełniania
Wartości atrybutów można usuwać z listy wartości atrybutu. W tym celu należy wybrać pojedynczą wartość na liście i nacisnąć przycisk DELETE (na klawiaturze). Wartość zostanie usunięta z opisu bibliograficznego (jeśli była tylko jedna wartość - pole zostanie wyczyszczone, jeśli było więcej wartości - wiersz z zaznaczoną wartością zostanie usunięty).
Widoki atrybutów
W wielu wdrożeniach zdarza się, że wykorzystywany schemat atrybutów jest bardzo rozbudowany, choć poszczególni redaktorzy zazwyczaj wypełniają tylko niewielką część spośród dużej liczby atrybutów. Dotyczy to w szczególności wdrożeń, które są przygotowane na przechowywanie obiektów różnego typu, przy czym każdy typ wymaga trochę innego zestawu atrybutów. Na przykład, prace naukowe wymagają atrybutów związanych z czasopismem, w którym się ukazały (nazwa, wydawnictwo, rok i numer wydania), a mapy - określenia miejsca i czasu, którego dotyczą.
W takiej sytuacji przydatny jest mechanizm widoków atrybutów. Redaktor pracujący z obiektami określonego typu może wybrać odpowiedni widok, dzięki czemu w edytorze będą widoczne tylko atrybuty przypisane do tego widoku, a pozostałe atrybuty zostaną ukryte (rysunek poniżej). Dodatkowo, dla widoku można określić, które atrybuty są wymagane (konieczne do uzupełnienia przez redaktora). Widok atrybutów można wybrać z menu rozwijalnego położonego tuż nad edytorem atrybutów. Szczegółowe informacje na temat widoków atrybutów i sposobu ich konfiguracji można znaleźć tutaj.
...
Prosty przykład działania widoków atrybutów
...
Słowniki synonimów
Jak wcześniej wspomniano metadane wspierane są przez mechanizm synonimów (szczegóły można znaleźć tutaj). Edytor metadanych pozwala na wprowadzanie synonimów dla zaznaczonej na tabeli metadanych wartości. Aby dodać synonimy do zaznaczonej wartości, kliknij przycisk Dodaj synonimy (patrz niżej), lub wybierz na klawiaturze kombinację klawiszy Ctrl oraz S (Ctrl+S) - zostanie wtedy wyświetlone okno synonimów (rysunek poniżej) dla wybranej wartości.
...
Okno synonimów
W oknie synonimów wyświetlone są aktualne synonimy wartości (panel Aktualne synonimy) oraz możliwe jest wprowadzanie nowych synonimów dla tej wartości na panelu Nowe synonimy. Aby dodać pierwszy synonim wystarczy wprowadzić tę wartość do listy nowych synonimów (panel Nowe synonimy). Aby dodać kolejne synonimy należy wybierać przycisk Dodaj i wprowadzać wartość do nowo powstałej pozycji. Aby usunąć synonim, wybierz wartość na liście a następnie przyciśnij Usuń. Aby zatwierdzić zmiany wybierz Zatwierdź, aby anulować wybierz Anuluj.
Uwaga! Aby wartości atrybutów wybranego elementu zostały zapisane należy przycisnąć przycisk Zatwierdź w prawym dolnym rogu Okna Właściwości.
Jeśli opis bibliograficzny zawiera wartość niejednoznaczną użytkownik musi wybrać odpowiednie jej znaczenie. Aby to zrobić aplikacja wyświetla okno wyboru grupy wartości (rysunek poniżej) gdzie użytkownik może wybrać grupę (znaczenie) do której należy niejednoznaczna wartość. Przykład: Załóżmy, żę w opisie bibliograficznym znajduje się wartość zamek a w systemie dLibra znajdują się dwie grupy wartości, które zawierają wartość zamek - grupę budynek oraz grupę zatrzask. W takim przypadku użytkownik musi zdecydować czy zamek to budynek czy może jest to zatrzask.
...
Wybór grupy dla podanej wartości
Język opisu bibliograficznego i wartości niezależne od języka
Opis bibliograficzny jest zależny od języka co oznacza, że użytkownik może wprowadzić opis bibliograficzny w różnych językach (o ile w systemie jest zdefiniowanych więcej niż 1 język). Aby zobaczyć/modyfikować opis w konkretnym języku należy wybrać odpowiednią zakładkę w edytorze wartości atrybutów. Nazwa zakładki to dwuliterowy skrót nazwy języka, a graficzna reprezentacja to piktogram reprezentujący dany język.
Załóżmy, że w naszej bibliotece wprowadzamy opisy bibliograficzne w języku angielskim i polskim. Aby wprowadzić autora danej pozycji w obu językach należałoby wprowadzić tę samą wartość autora w obu językach. Aby następnie zmodyfikować wartość autora należałoby wykonać modyfikację dwukrotnie (dla każdego języka osobno). W tej sytuacji wartość autora jest niezależna od języka, czyli dotyczy obu języków (taka sama wartość powinna być wprowadzona w każdym języku). Aby ułatwić wprowadzanie/modyfikację opisu bibliograficznego w takich sytuacjach w systemie dLibra został wprowadzony specjalny język niezależnych wartości (na zakładkach oznaczony jako "Niez."). Język ten jest tylko i wyłącznie na użytek redaktora (opis w tym języku nie jest widoczny na portalu WWW). Wartości wprowadzone w tym języku są automatycznie dodawane do opisów innych języków przed wyświetleniem ich na portalu WWW.
Załóżmy przykładowo, że w aplikacji redaktora wprowadziliśmy wartość atrybutu "Tytuł" w języku wartości niezależnych dla wydania A. Na stronie WWW wydania A użytkownik widzi tę wartość tytułu w każdym języku. Warto tutaj zaznaczyć, że wartości niezależne są dodawane (nie zastępują innych wartości) do wartości w innych językach.
Narzędzia pomocnicze
Nad tabelą opisu bibliograficznego znajduje się zestaw przycisków dzięki którym możliwe jest wykonanie dodatkowych operacji na metadanych. Kolejno (poczynając od lewej strony) są to:
- - czyści edytor metadanych (usuwa wszystkie wprowadzone wartości). Wszystkie wartości wprowadzone do opisu zostają usunięte.
- - wyświetla metadane w osobnym oknie (pozwala na wygodniejsze przeglądanie metadanych w przypadku gdy znajdują się w nich bardzo długie wartości).
- - wyświetla w tabeli metadanych wartości, które są dziedziczone (wartości wyświetlone są w kolorze czerwonym, nie można ich modyfikować, nie można dodawać wartości do atrybutu w którego wartościach wyświetlana jest wartość dziedziczona). Przycisk nie jest aktywny jeśli element nie może dziedziczyć metadanych (nie znajduje się w obiekcie grupowym).
- - kopiuje wszystkie wartości dziedziczone do opisu elementu (wartości dziedziczone zostają dodane bezpośrednio do metadanych elementu). Przycisk nie jest aktywny jeśli element nie może dziedziczyć metadanych (nie znajduje się w obiekcie grupowym).
- , , lub - wyszukuje potencjalne duplikaty w serwisie FBC (Federacja Bibliotek Cyfrowych sieci PIONIER - http://fbc.pionier.net.pl) na podstawie wartości wprowadzonych do opisu. Przycisk ten jest widoczny tylko podczas tworzenia nowych elementów (np. w kreatorze nowego obiektu). Atrybuty, których wartości są wykorzystywane do wyszukiwania duplikatów, wyświetlone są pogrubioną czcionką. W trakcie wprowadzania opisu bibliograficznego aplikacja automatycznie sprawdza, czy istnieją potencjalne duplikaty i w zależności od wyniku uaktualnia ikonę wyświetlaną na przycisku. I tak:
- - oznacza, że wartości wprowadzone w opisie nie wystarczają do tego by z dostateczną dokładnością określić to czy istnieją potencjalne duplikaty. Ikona ta pojawia się również wtedy gdy aplikacja jest w trakcie wykonywania operacji wyszukiwania duplikatów lub system FBC nie jest dostępny.
- - oznacza, że nie znaleziono potencjalnych duplikatów.
- - oznacza, że istnieją potencjalne duplikaty, natomiast zapytanie wyszukiwawcze nie było pełne (ponieważ nie są wprowadzone wartości we wszystkich atrybutach, które brane są pod uwagę przy wyszukiwaniu) stąd wynik jest przybliżony.
- - oznacza, że istnieją potencjalne duplikaty, zapytanie wyszukiwawcze było pełne (są wprowadzone wartości we wszystkich atrybutach, które brane są pod uwagę przy wyszukiwaniu) przez co jest wysoce prawdopodobne, że znalezione elementy są faktycznymi duplikatami.
Anchor addSynonyms_icon addSynonyms_icon
 - otwiera okno dodawania synonimów dla aktualnie zaznaczonej wartości (patrz wyżej). Przycisk jest aktywny tylko wtedy, gdy w tabeli wartości atrybutów jest zaznaczony wiersz z niepustą wartością – opens the window for adding synonyms for the currently selected value (see above); the button is only active when a row with a non-empty value is selected in the value table.
| Anchor | ||||
|---|---|---|---|---|
|
Metadata Import
...
Edytor wartości atrybutów umożliwia importowanie opisu z zewnętrznego pliku, który zapisany jest w odpowiednim formacie. Administrator biblioteki cyfrowej może dodać tzw. rozszerzenia do aplikacji, które pozwolą na importowanie opisu z różnych formatów. Rozszerzenia dostępne domyślnie pozwalają na importowanie opisu z następujących formatów:
- format wymienny MARC 21 (szczegóły konfiguracji znajdują się w rozdziale konfiguracja aplikacji redaktora oraz załączniku import MARC).
- format XML (konfiguracja domyślna pozwala na import z formatu RDF oraz MASTER, szczegóły konfiguracji znajdują się w rozdziale konfiguracja aplikacji redaktora oraz załączniku import XML).
- format Bibtex (szczegóły konfiguracji znajdują się w rozdziale konfiguracja aplikacji redaktora oraz załączniku import Bibtex).
- format CSV (szczegóły konfiguracji znajdują się w rozdziale konfiguracja aplikacji redaktora oraz załączniku import CSV).
- format .properties (szczegóły konfiguracji znajdują się w rozdziale konfiguracja aplikacji redaktora oraz załączniku import .properties).
...
The attribute value editor makes it possible to import a description from an external file saved in an appropriate format. The digital library administrator can add so-called extensions to the application – they will make it possible to import a description from various formats. The extensions available by default allow description import from the following formats:
- the MARC 21 exchange format (for configuration details, see the Configuring the Editor Application chapter and the MARC Import appendix;
- the XML format (the default configuration makes it possible to import from the RDF and MASTER formats; for configuration details, see the Configuring the Editor Application chapter and the XML Import appendix);
- the Bibtex format (for configuration details, see the Configuring the Editor Application chapter and the Bibtex Import appendix);
- the CSV format (for configuration details, see the Configuring the Editor Application chapter and the CSV Import appendix); and
- the .properties format (for configuration details, see the Configuring the Editor Application chapter and the .properties Import appendix).
In order to import metadata from an external source, the user should press the “Import...” button in the “Import/Export” panel. The metadata import window will appear (see the image below).
| Anchor | ||||
|---|---|---|---|---|
|

Okno importu metadanych
Okno importu metadanych pozwala użytkownikowi na wyspecyfikowanie zewnętrznego źródła opisu bibliograficznego oraz format źródłowego pliku. Źródło metadanych może być specyfikowane przez wybranie konkretnego pliku z dysku komputera, wskazanie pliku przy użyciu adresu URL lub wskazanie pliku poprzez rozszerzenie aplikacji redaktora. W przypadku opcji URL przydatne może być przeciąganie hiperłącza ze strony internetowej i upuszczanie na pole w którym należy wprowadzić URL - hiperłącze zostanie automatycznie tam wklejone. Domyślnie aplikacja redaktora ma zainstalowane następujące rozszerzenia pozwalające wybrać metadane:
- rozszerzenie Z39.50 - pozwala pobierać metadane z serwerów Z39.50 (szczegóły znajdują się w załączniku opisującym rozszerzenie Z39.50).
Po wskazaniu pliku metadanych do importu, aby je zaimportować wybierz przycisk Importuj. Jeśli użytkownik na liście Format wybierze opcję Wykryj automatycznie, aplikacja spróbuje automatycznie wykryć format źródłowego pliku i zaimportować znajdujące się w nim metadane. Redaktor może również wyspecyfikować format pliku do zaimportowania.
...
The metadata import window
The metadata import window allows the user to specify an external source of the bibliographic description and to specify the format of the source file. The metadata source can be indicated by selecting a specific file from the computer drive, by indicating the URL of a file, or with the use of an extension of the Editor Application. If the URL option is chosen, the user may drag the link from the web page and drop it in the field in which the URL is to be entered. The link will be automatically pasted there. By default, the following extension for selecting metadata is installed in the Editor Application:
• extension Z39.50 – it makes it possible to retrieve metadata from Z39.50 servers (for details, see the appendix which describes extension Z39.50).
To import a metadata file, the user must indicate it and click the “Import” button. If the user chooses the “Detect automatically” option on the “Format” list, the application will try to automatically detect the format of the source file and import the metadata from it. Alternatively, the user may indicate the format of the source file.
If the file with metadata contains more than one value set, the application will ask the user to indicate one value set (see the image below).
| Anchor | ||||
|---|---|---|---|---|
|

Okno wybru zestawu metadanych
Eksport metadanych
Edytor wartości atrybutów umożliwia eksportowanie opisu do zewnętrznego pliku, który zapisany będzie w odpowiednim formacie. Administrator biblioteki cyfrowej może dodać tzw. rozszerzenia, które pozwolą na eksport metadanych do odpowiednich formatów. Rozszerzenia dostępne domyślnie pozwalają na eksport metadanych do następujących formatów:
- format RDF (szczegóły konfiguracji znajdują się w rozdziale konfiguracja aplikacji redaktora oraz opisie eksportu w formacie RDF).
- format CSV (szczegóły konfiguracji znajdują się w rozdziale konfiguracja aplikacji redaktora oraz opisie eksportu w formacie CSV).
- format .properites (szczegóły konfiguracji znajdują się w rozdziale konfiguracja aplikacji redaktora oraz opisie eksportu w formacie .proeprties).
The metadata set selection window
Exporting Metadata
The attribute value editor makes it possible to export a description to an external file saved in an appropriate format. The digital library administrator can add so-called extensions, which will make it possible to export metadata to various formats. The extensions available by default allow metadata export to the following formats:
- the RDF format (for configuration details, see the Configuring the Editor Applicationand the description of exporting metadata in the RDF format);
- the CSV format (for configuration details, see the Configuring the Editor Applicationand the description of export to the CSV format); and
- the .properties format (for configuration details, see the Configuring the Editor Application and the description of export to the .properties format).
In order to export metadata to an external file, the user should click the “Export...” button. The metadata export window will appear (see the image belowAby wyeksportować metadane do zewnętrznego pliku wybierz przycisk Eksportuj... - pojawi się okno eksportu metadanych (rysunek poniżej).
| Anchor | ||||
|---|---|---|---|---|
|

Okno wyboru zestawu metadanych
...
zestawu metadanych
The metadata export window allows the user to select the file to which the metadata are to be saved and to choose the format of that file. In order to export metadata, the user should click the “Export” button.